Here is an excerpt from the first song on the album of my new progressive rock project, THEO.
Featuring myself on keys and vocals, Gary Davenport on Chapman stick, Kevin Depree on drums and background vocals, and Jake Reichbart on rhythm guitar. Special guest Zach Zunis plays lead guitar on this cut. This is about half of the song; it fades out at the beginning of the middle section, before the reprise.
THEO is a project I’ve been wanting to do for a long time and is, in many ways, a return to my roots. I grew up listening to Genesis, Pink Floyd, Yes, ELP, The Beatles, King Crimson, Jethro Tull, and many more progressive bands, as I discussed in this previous article. And I still love that music and the textures and emotions it encapsulates.
Please consider becoming a fan on FB via this link:
Big John Patton was a big inspiration on my playing and I’m very proud of this record. It is the only tribute album for him of which I’m aware. Enjoy and please subscribe to my YouTube channel.
Back in October of 2013 I posted a video in which I played along with a MIDI version of the Genesis classic “In The Cage”. The original post is here. I wrote about my love of the band and some personal history, so I won’t clutter this post with a rehash.
Tonight I was playing around with Cubase 7.5 and started diving into the new HALiotron engine in the HALion Sonic 2 VST virtual instrument. The presets leave a lot to be desired, which is often the case, but editing is very straightforward and the plug includes fairly standard Mellotron sounds including flutes, brass, bass clarinet, clarinet, strings, 8 voice choir, and bassoon. I hope they release an expansion pack with more sounds like the bass accordion, cello, violin, and viola samples. But the included samples are a good and popular starting point.
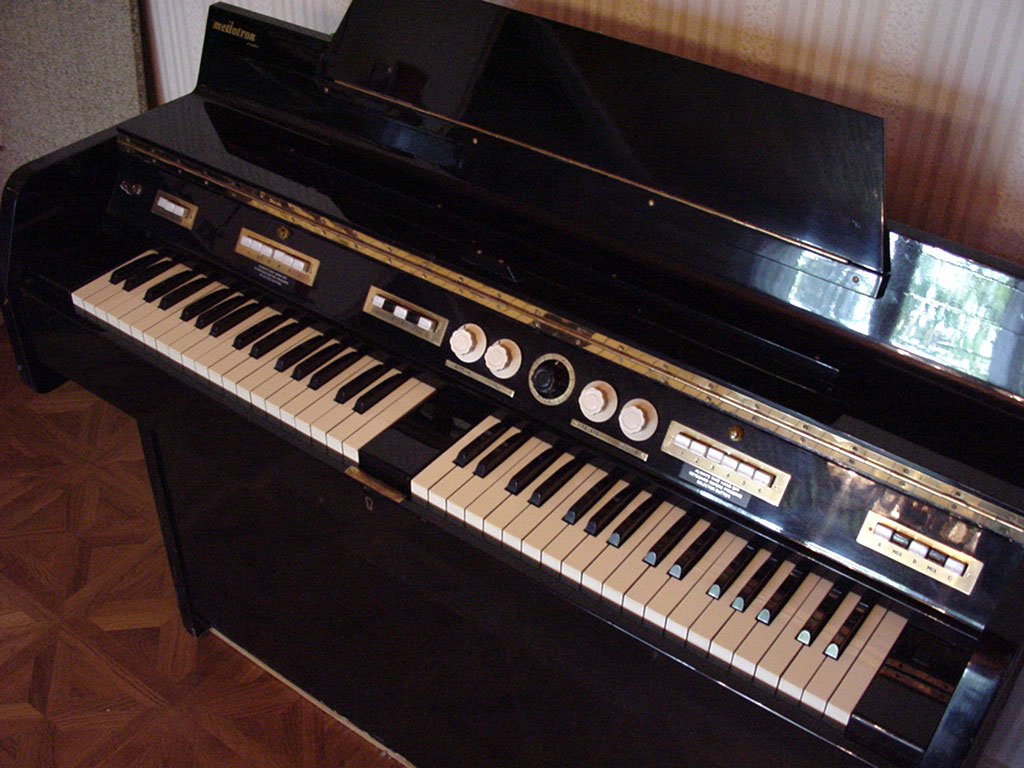
I began with a blank program and loaded the string and brass samples into slots A and B respectively in the Tape Track selector switch. Like the original Mellotron Mk II you can position the switch in between selections and combine the sounds. This is how Tony Banks achieved the iconic timbre of his intro to “Watcher Of The Skies” with Genesis. He also used the bass accordion sound on the other keyboard (the Mellotron Mk II had two keyboards side by side).
Mellotron Mk II
I added just a hint of reverb and then played the sound from my Minimoog Voyager acting as a MIDI controller. It makes a rather nice controller for such purposes due to the limited number of keys. The Mk II had two 35 note manuals. The Voyager has 44 keys.
I was lazy and just recorded the sound coming from my speakers so what you’re hearing is from the iPhone’s internal microphone. But it still sounds pretty good. The HALiotron has some nice tonal shaping options including attack, decay, velocity as well as control over the filter. You can choose to loop the samples or play with the same 8 second limitation as the real thing. Overall, it’s a nice addition to the HALion VST and I’ve used it a few times already on my upcoming progressive rock album.
As the processing capabilities of personal computers increase and the skill of programmers to emulate analog audio qualities in digital form also improve, plug-in companies have rushed to digitally re-create almost every piece of classic gear from the golden era of recording studios. These studio stalwarts exist in several incarnations from various companies, with varying degrees of success. You’ve got your Pultec emulations, your 1176 emulations, your LA2A emulations, Neve, API, and SSL emulations, plate reverb emulations, EQ emulations, microphone preamp emulations… and the list goes on and on.
Plugs plugs plugs plugs plugs plugs plugs plugs!
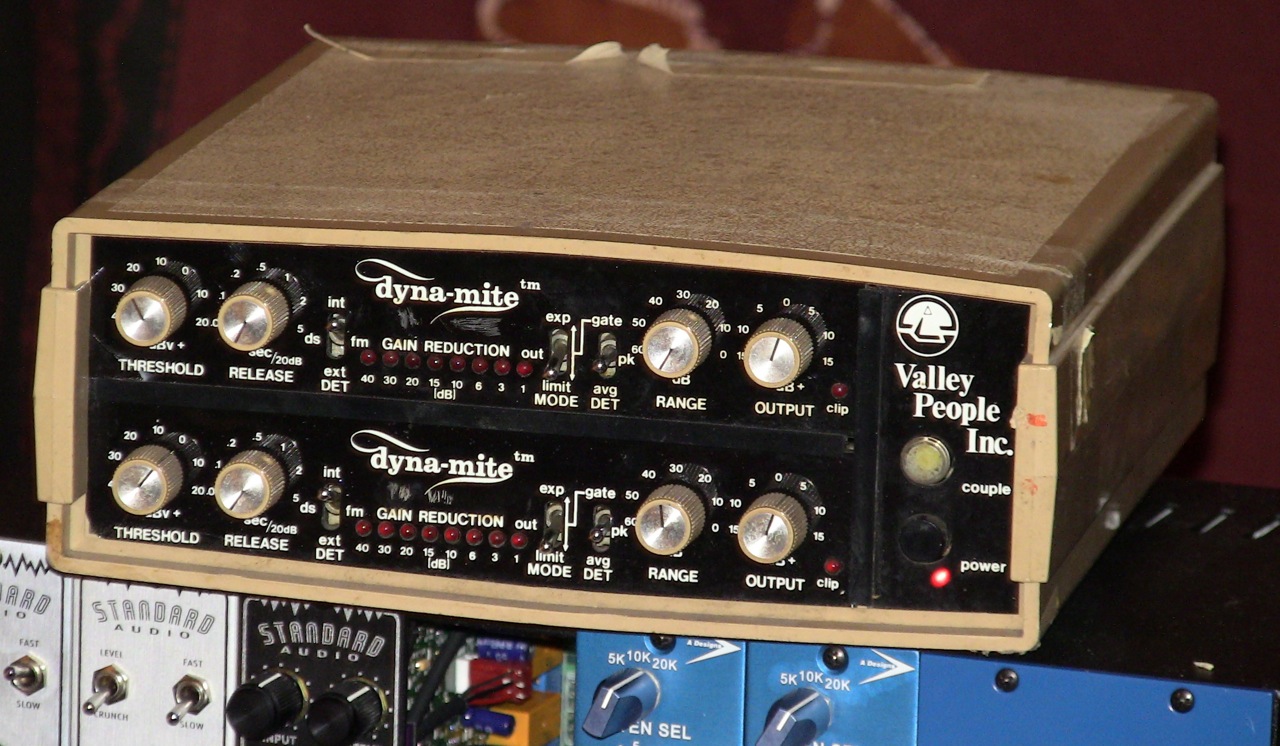
One manufacture from that era conspicuously absent so far is Valley People of Nashville. The history of Valley People is quite interesting and you can read more about it on their website. The short version is that an electronics guru named Paul Buff worked with Frank Zappa to build Zappa’s famed PAL studios and designed some proprietary gear in the process. A short time later, Buff officially formed Valley People and put those designs into commercial products including the Gain Brain, Transamp, Kepex, and the Dyna-mite.
My first exposure to Valley People gear was in my friend Glenn Brown’s studio. He had an rack of the now defunct 800 format filled with Kepex and Gain Brain modules. I noticed he liked to use them on drums. But his real secret weapon was a stand-alone stereo Dyna-mite compressor. He no longer has the rack, but he still uses the Dyna-mite frequently as a drum bus parallel compressor, a role in which it absolutely shines.
An original Dyna-mite in a beige plastic case. This is like the one my friend Glenn owns.
You can still pick up an original Dyna-mite unit on the used market for a reasonable price. We’ll see how long that lasts! Of course the limitations of outboard gear include the lack of recall and the obvious fact that you can only use it on one or two things at a time unless you own a rack of several. Who has space for that?
So I was very excited when I found Softube’s digital version of the Valley People Dyna-mite. If it captures the essence of the real thing, it would not only be cheaper but much more convenient and flexible to own. I just happen to have a real Dyna-mite unit here in my studio, on loan from Glenn, so I thought I’d do a quick comparison between the plug-in version and the real thing. This is not a very scientific endeavor so please excuse any oversights.
CONTROLS / INTERFACE:
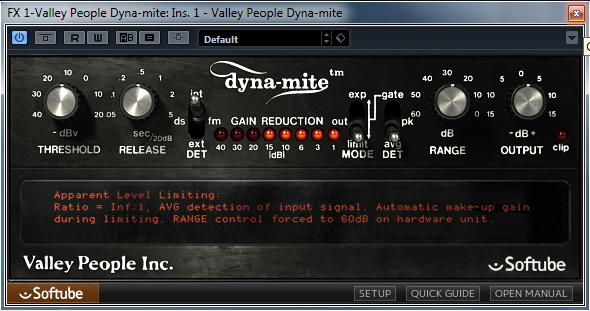
First and foremost, the Softube Valley People Dyna-mite plug-in looks like the real deal, with the same controls in the same order, the same LED gain reduction metering, and even the same fonts. It is a prime example of the modern philosophy of skeuomorphism in digital design but in this case it makes perfect sense. Softube intends the plug-in to faithfully capture the real analog unit. Making the plug look the same is the first step.
The first control on the left is for the THRESHOLD which determines the signal level at which the compressor is engaged. Second is a knob for RELEASE which controls how quickly the compressor returns to normal (no compression). The next control DET, the detection circuit, is switchable between INT (internal), DS FM (essentially de-essing), and EXT (external). Next is the 8 LED meter followed by the MODE switch. The three modes are EXP (expansion), OUT (bypass) and LIMIT (limiter). Next is yet another switch labeled DET, this time linked to the MODE and with three choices; AVG (average), PK (peak), and GATE. Essentially this changes the ratio of the compression. Finally a RANGE knob and OUTPUT knob finish out the controls.
This is the dual unit I’ll be using for this test. Pay no attention to the LA610 beneath.
It is beyond the scope of this review to describe how all these functions work in conjunction with one another. The original Dyna-mite manual is available at the Softube website if you want to dig in to the technical side of things. In short, you can use the Dyna-mite not only as a compressor but also a gate, fast attack limiter, slow attack limiter, expander, or de-esser, making it quite versatile. The plug-in purports to accurately model all of this, including a “Weird Limiting” mode which is an unintended feature of the original device. From the review on the Sonicscoop site:
If the detector mode is set to LIMIT and the detector type is set to GATE, you end up with a scenario in which any signal above a certain threshold is hard limited. The range and release controls really come into play here. If the range is set too high, you end up hearing nothing except clicking, presumably the attack time of the limiter as it is engaged. Similarly, if the release time is set too long, you also end up with silence, as the compression takes to much time to be released. However, if your range is set to around 5-6 dB, and the release time around a few ms, you’ll hear some interesting pumping and modulation effects on your source.
Sounds like fun! The manual from Softube goes into great detail about how to use the Dyna-mite and is worth a read through upon purchasing.
COMPARISON:
Ok, so now to the nitty gritty. How accurate is Softube’s emulation? Let’s do some examples. I’ll use the Dyna-mite as a parallel drum bus compressor, since that’s most likely what I’ll be using it for in most circumstances.
Side note: What is parallel compression? It is simply mixing some dry, uncompressed signal in with the compressed signal. For background and examples, this Sound On Sound article is very good:
Here is a drum sample from my upcoming progressive rock project. The drummer is my friend Kevin DePree playing his DrumCraft acrylic kit. This is a dry sample with no bus compression although there is EQ on the individual mics and some light compression on the kick and snare.
Next, let’s use the Softube Valley People Dyna-mite as a parallel bus compressor. Notice I am not matching levels with the dry audio as this is not about how the compressor colors the sound compared to the dry but rather whether the plug-in sounds like the real deal. I will level-match the audio from the plug-in and the real unit.
The settings on the plug-in are fairly simple. Threshold and Release are both at 12 o’clock, the detection circuit is set to INT, the MODE and DET switches are set to LIMIT and AVG and the range is also at 12 o’clock. It has a nice, full, and punchy sound. I’m compressing the signal quite hard, reaching about 20 db of gain reduction on the heavy peaks. But when mixed back in with the dry signal, it adds both body and girth to the sound. That’s what parallel compression is about!
Softube Valley People Dyna-mite settings for the above sample.
Now let’s see how the real Dyna-mite sounds with similar settings. This was a bit tricky because the unit I have needs to be calibrated. One side requires much more make up gain than the other. This may affect the sound of the actual compression and skew the comparison.
And finally, here are both the plug-in and the real unit together, swapped every 10 seconds. The first 10 seconds is the real unit, the next 10 seconds is the plug-in, the next 10 the real unit again, etc.
CONCLUSION:
To my ears, the real unit has very slight upper end sparkle and also a “live” quality to the midrange, especially evident on the snare. I’m talking a minuscule amount here, nothing huge. Of course, this could be due to a couple of things; I had to manually align the audio from real unit to the original un-compressed track and while I did it to what appeared to me to be sample accuracy, it could be ever so slightly off which would induce tiny phase issues and thus alter some frequencies. It could also be due to the extra analog to digital and digital to analog conversion required in order to insert the real unit into my system. It could be due to the issue of the output of the first channel on the real unit needing calibration. And finally this particular Valley People unit could be overall a bit out of spec. It did come used off eBay afterall and is over 30 years old.
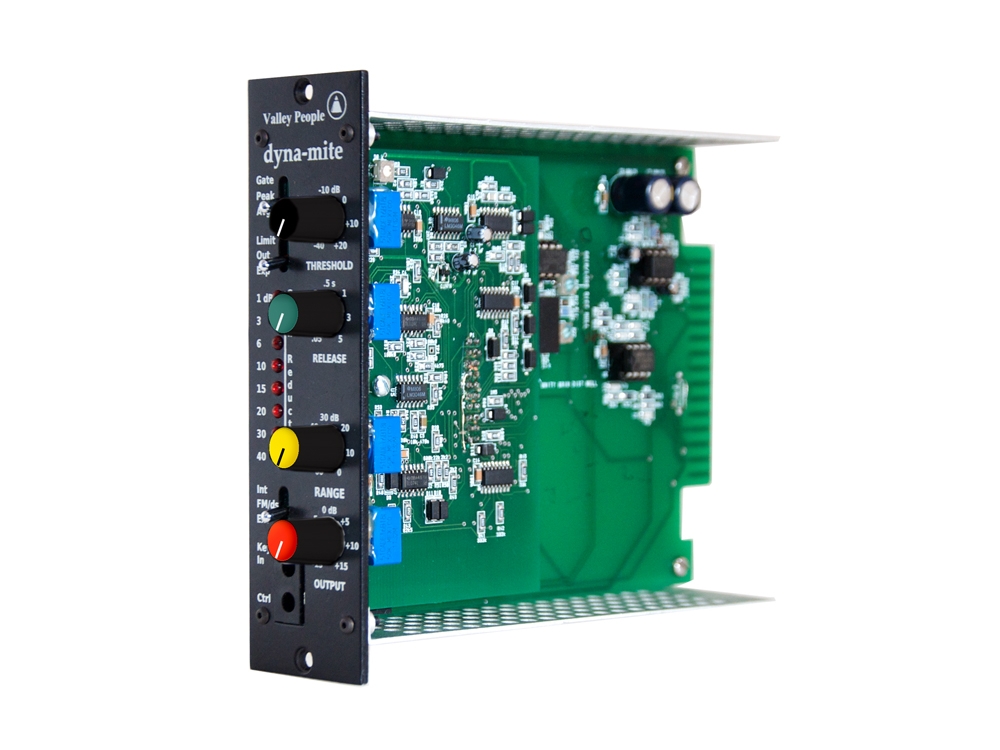
Valley People was bought by the PMI Group in 2007 and is now making 500 series versions of their most popular designs. A 500 series Dyna-mite is available but at a cost of $599.
Regardless, the simulation and the real deal are extremely close. The character of the compression is dead on. That little bit of extra sparkle could be added with some EQ. Or perhaps the track doesn’t need it? The flexibility of the plug-in certainly adds to its appeal. It doesn’t use much CPU and can be used as a gate, de-esser, and limiter as well as a compressor. Not to mention you can use it on as many tracks as your computer can handle.
I’ve experimented with the Softube Valley People Dyna-mite on vocals both as compressor and de-esser. As a de-esser it does a good job with that vintage vibe. As a compressor on vocals, not so much. It is better on percussive material, guitars, and keys (especially for that extreme in-your-face compressed piano sound). I think it’s strong point is as a parallel bus compressor on drums. It really shines in that role and is worth the money for that purpose alone. And this is true of both the real unit and the plug-in. Kudos to Softube for the authentic emulation. It emulates with near-perfect accuracy the Dyna-mite’s strengths, character, oddities, and weaknesses.
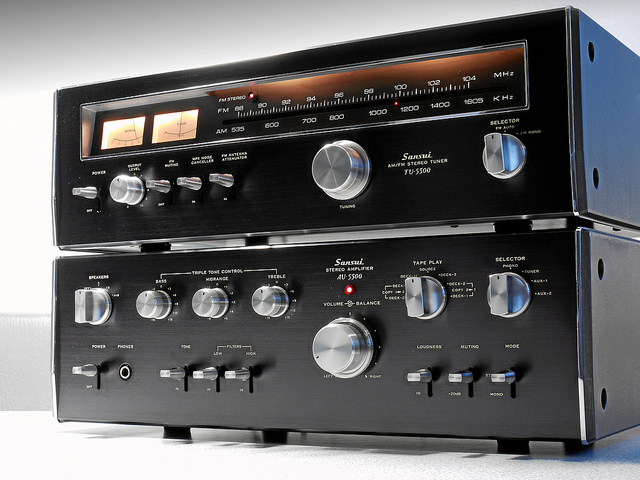
Speakers are a personal thing. I grew up listening to my father’s hi-fi system, of which he was very proud. It consisted of a Sansui AU-5500 integrated amp driving a pair of Pioneer three-way speakers with 12″ woofers. It sounded great for vinyl playback and he even had twin cassette decks for A to B or B to A dubbing as well as taping from the radio or LPs. I made many a mix tape on that system. Although in a two bedroom house with six other siblings, I spent most of my time under headphones.
The Sansui AU-5500 with matching tuner. Vintage Japanese hi-fi is very cool. My brother is currently using the amp to power a pair of B&W 602 speakers with satisfying results.
I splurged during college and bought a pair of B&W CDM SE1 bookshelf speakers with matching subwoofer, powered by an Adcom preamplifier and amp. I also bought a nice VPI turntable, which is the only piece of that system I still own. Once my wife and I started our family, a dedicated listening room became a fantasy and a liability. And I needed the money for the little mouths!
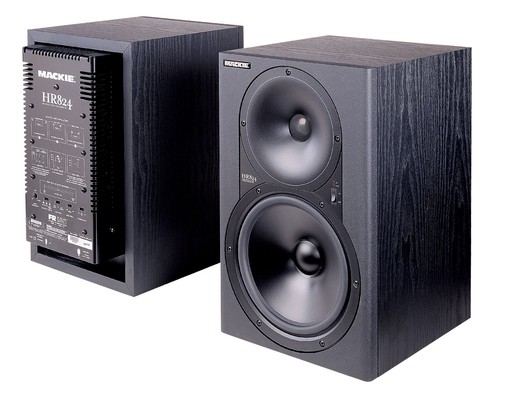
I hung on to the B&W sub for awhile as well but eventually traded it for a pair of Mackie HR824 studio monitors in 2008 to replace some Alesis M1 active monitors that I never liked. To be honest, I’ve never cared for the Mackies either but I’ve learned their (many) weaknesses and can whip up a decent mix on them. Still it was a good trade; finally I had a decent monitoring solution for my burgeoning humble home studio setup.
Mackie HR824. They’re not bad. They’re not very good either, but hey…
I’ve worked in many studios with a range of different monitors. I’ve used to work every day on a pair of Genelec 1031A monitors at Michigan State University. I have my opinions about a lot of different brands. But one brand I never paid much attention to is JBL, despite having nothing but respect for the company and its lineage.
I attended my first AES show in NYC in October 2013 with my good friend and studio owner / engineer / acoustician / musician Glenn Brown. While I was mainly enamored with the beautiful microphones, the tantalizing mic preamps, the retro tube outboard gear, and especially the Yamaha Nuage system (drool!), I did spend an afternoon listening to all the monitor speakers I could find on the floor. This included the new series from Neumann, the top of line ATC model, the new five-figure Genelecs, the Yamaha HS series, and a bunch I cannot even recall.
On a whim, Glenn and I stopped by the JBL display and they had their brand-new LSR 3-series hooked up. We listened for a bit and were both immediately impressed by the sound. Both the 305 and the larger 308 sounded really good, with a slight edge going to the 305 in terms of the tightness and definition of the mid-range. Even on the noisy AES floor, the speakers made a lasting impression.
I asked the JBL rep about the price of the 305 model and he said the MAP was $399. I said, “Oh, $399 each, that’s not bad at all.” He said, “No, $399 for the pair.” To say I was shocked is an understatement. I put them in the back of my mind for a potential future purchase.
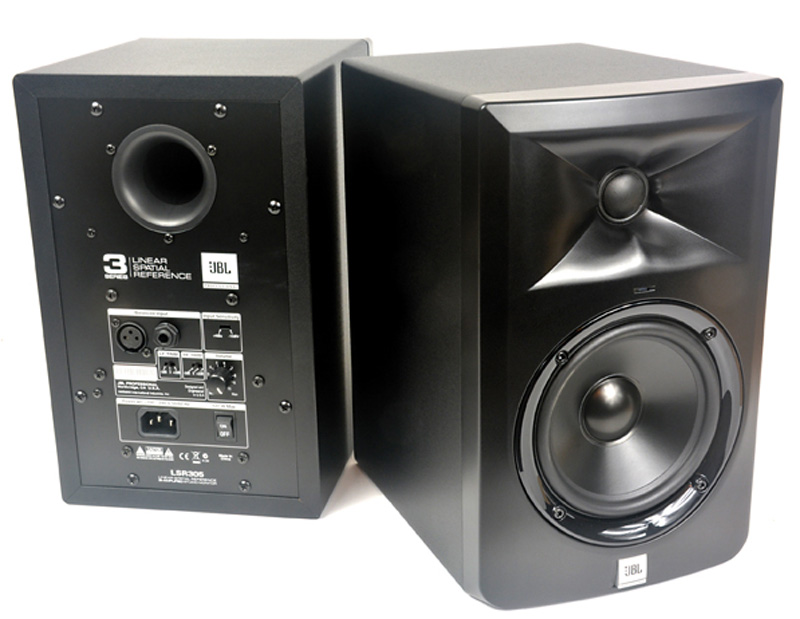
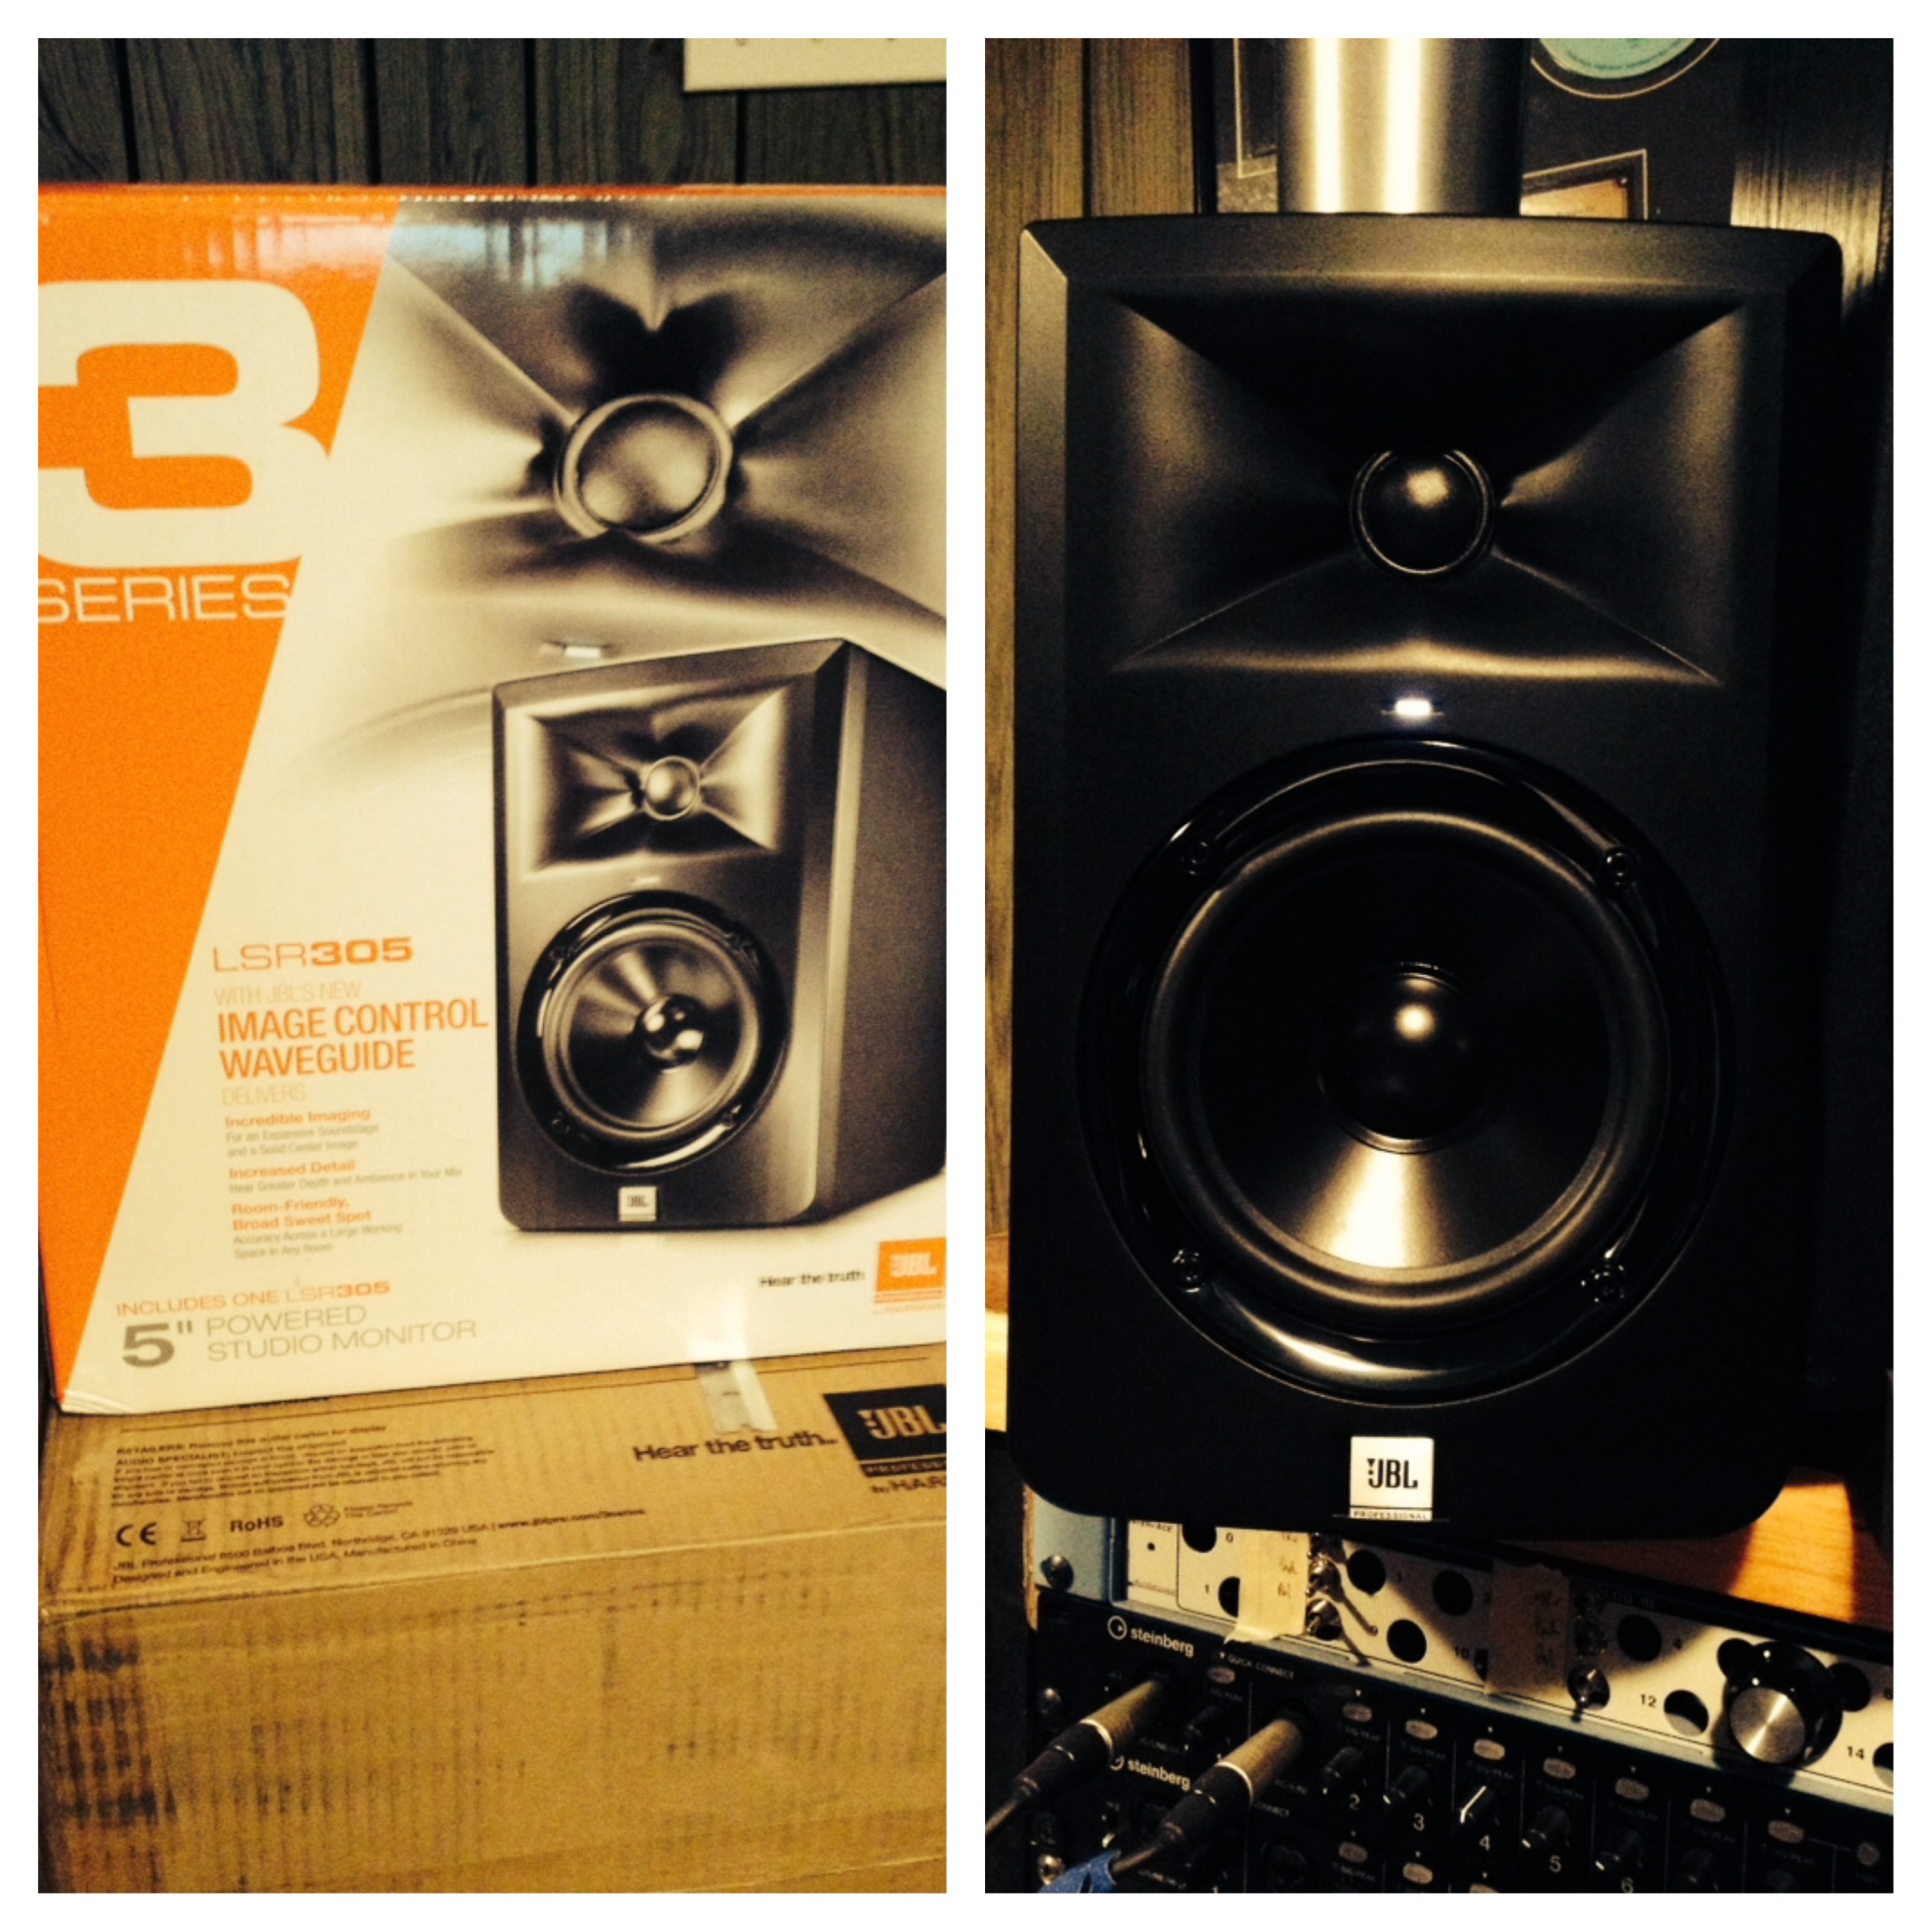
JBL LSR305 speakers
At the moment, I am in the middle of mixing three projects; Greg Nagy’supcoming release (which I also engineered as well as wrote songs for and performed on), my own progressive rock project, and a cool little EP for a friend’s band featuring Farfisa accordion, drums, and guitar. I thought the time was perfect to revisit the JBL LSR305 monitors, especially since JBL lowered the price to $119 each*. I figured if I didn’t like them in the studio, what did I have to lose? At the very least I could use them on my workbench to play some tunes while I’m fixing pianos and such.
Now I’ve only had them for a few hours but difference between the Mackies and these little JBLs is, to use a common cliche, night and day. The JBLs are about half the size, but the sound they put out is incredibly enveloping, with pinpoint stereo imaging, a detailed mid-range, beautiful high-end, and a tight low-end that’s only limited by the size of the 5″ woofer. No you won’t be able to hear those low sub basses if you’re doing electronic music, but for almost everything else there’s plenty down there. And frequencies are balanced perfectly; the highs revealing and non-fatiguing, the mid-range focused and clear, and the low-end tight and defined. JBL does offer a companion subwoofer, the LSR310s, if your music needs it. That may very well be my next purchase.
The biggest surprise is the stereo imaging. I can now hear (FINALLY!) in exquisite deatil when I move the panning control within Cubase even just 1 notch to the left or right. They also exhibit a sense of depth that makes you feel like you can reach right into the audio.
The feature set is pretty basic. The back has the IEC power connector (cord included), on/off switch, XLR and separate TRS 1/4″ inputs (no combo jacks, hooray!), an input sensitivity switch (-10dBv or +4dBu), master volume, and two contour switches that affect the highs and lows. A nice soft white LED on the front signifies power. That’s it. Right now I’m running mine completely flat (no EQ engaged) and the volume all the way up, controlling the levels from my Yamaha N12 mixer.
The frequency range is listed as 43 Hz to 24 kHz. A quick test with a sine wave generator in Cubase confirmed that they do indeed emit 43 Hz, albeit with a rather steep drop-off in volume.
So are there any negatives? Just one that I’ve noticed so far; they are a bit noisy. An audible low-level white noise hiss is present at all times and does not change regardless of the position of the master volume knobs. It isn’t terribly loud but it’s constant.
Other than that small issue, I love these speakers. I have no idea how JBL is able to make these at such an affordable price. They are easily worth three times the list. If you’re looking for a compact near-field monitor for your home studio, or a second pair of speakers for comparison, just buy them. You won’t be disappointed. Check out the cool speaker comparison widget over at Sonic Sense to hear how they stack up against the big dogs and then give my friends at Sweetwater a call to get a great deal.
Boxed and sitting up on my desk. Good looking little guys, too!
UPDATE (Nov 3, 2014): I just bought three more LSR305 speakers in order to create a 5.1 mixing environment in my studio. I have removed the Mackies and I’m selling them. I also have the LSR310s subwoofer on order from Sweetwater. I am very happy with the LSR305 speakers. My mixes have improved immensely and I notice details I didn’t notice before. I can’t recommend these little speakers enough.
UPDATE (Dec 3, 2014): The LSR310s subwoofer is the perfect match for the speakers, as one would expect. I was using a friend’s KRK sub with my Mackies and the JBL is far tighter, more defined, and more balanced. I was able to do the first 5.1 mixing for my THEO project and I am thrilled with how they came out. The mixes translated extremely well in the professional mastering studio after mixing on the JBL 5.1 system.
* NOTE: The $119 each price quoted above was a special summer sale via Sweetwater. The normal price is $149 each, though deals can be had.
I really enjoy old corporate technological films and thankfully so do a lot of other people on YouTube. I’m not ashamed to admit I spent a day watching old Fairchild Seminconductor films recently. And I enjoyed every minute of them.
I found this video a few years ago and it’s incredible. A tour of the Hammond factory probably circa the late 1950’s. It describes the concept of tonewheels and their manufacture, as well as the voicing of each instrument.
The most surprising piece of information to me was the statement about “five Hammond organ plants”. I had no idea the company was that large at one time.
I also love the part about the trained technician checking each tonewheel by ear to make sure it sounds correct. This is why the tonewheel organ is, in many ways, like an acoustic instrument. The organ is ‘voiced’ by a technician, just like an acoustic piano. Technicians would hand-pick each filter capacitor in the generator in order to mold the overall tone to their liking. They even signed the tone generator with their initials.
My late father referred to the Hammond organ as a prime example of what he called “post-WWII over-engineering”. They really are amazing products from the golden age of American manufacturing and engineering.
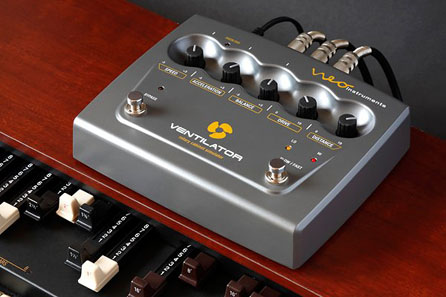
When Neo Instruments released the Ventilator in 2010 it quickly became the standard by which all other rotary speaker simulators are judged. With easy accessibility to five real-time controls, bullet-proof construction, fantastic overdrive, and an extremely authentic dual-rotor emulation, the Ventilator justifiably took the reigns as king of the sims.
The original Ventilator. Read my review of the original by clicking on the picture.
Success breeds competition, however, and the Ventilator is no longer alone. In the intervening years, several competitors have arrived to try and wrestle the crown away from Neo Instrument’s flagship product. The BURN from GSi boasts 32 presets, a real tube overdrive section, MIDI control, and multi-effects. The Strymon Lex is much smaller and less expensive yet still has real-time controls. Pigtronix is releasing an all-analog emulation that promises to be very interesting. And the owner of the Leslie name, Hammond-Suzuki, released their own Leslie branded pedal featuring four distinct speaker emulations (122a, 147a, 18v, PR40) and plenty of real-time control.
Neo Instruments discontinued the original Ventilator in 2013 while introducing two new products, the Mini Vent and the Mini Vent for organ. These pedals are smaller (the same size as the Strymon Lex), less expensive, and have two programmable presets each. But they lack the real-time control and remote control input of their predecessor. You can read my review of the Mini Vent by clicking here, which includes a video.
Neo Instruments Mini Vent
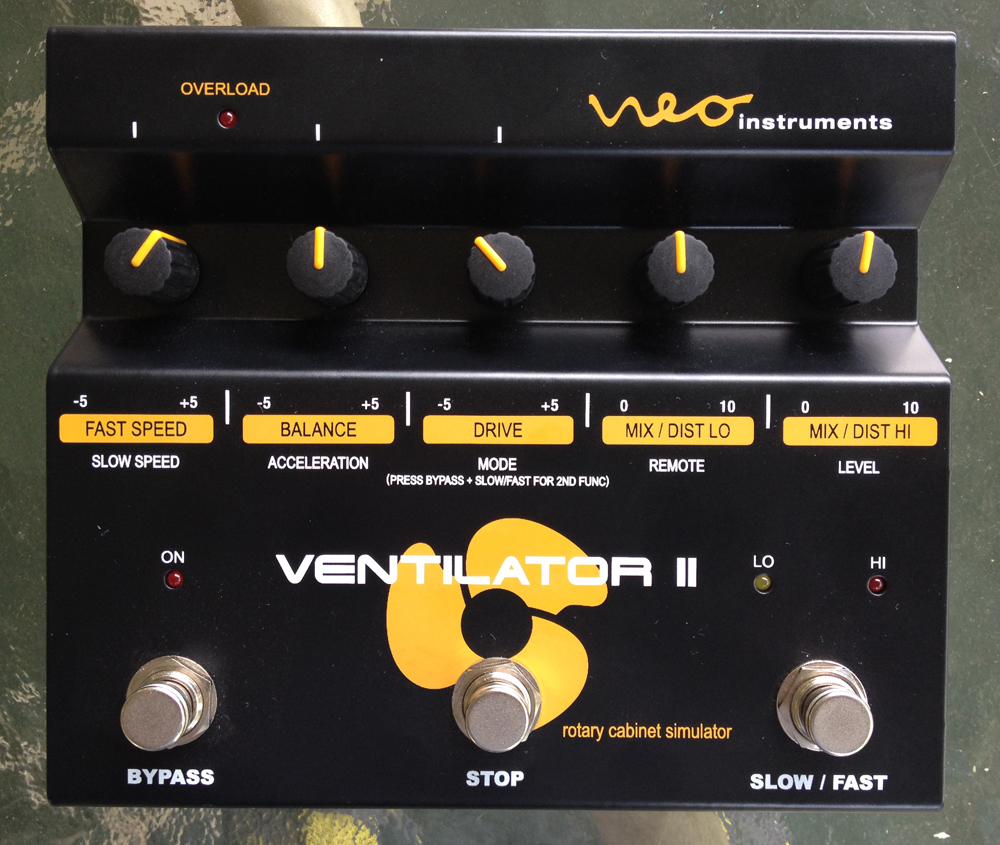
Neo Instruments announced a successor to the original Ventilator in the spring of 2013. After a long wait, the Ventilator II is finally here. The footprint is similar though the look is much sleeker while still retaining the aforementioned bullet-proof construction of the original. The five real-time controls are still there but all five have dual functions accessible via a 2nd Function mode. How does the Ventilator II stack up against the original? How does it compare with the competition? What are the new features? And is it worth upgrading?
PHYSICAL SPECS:
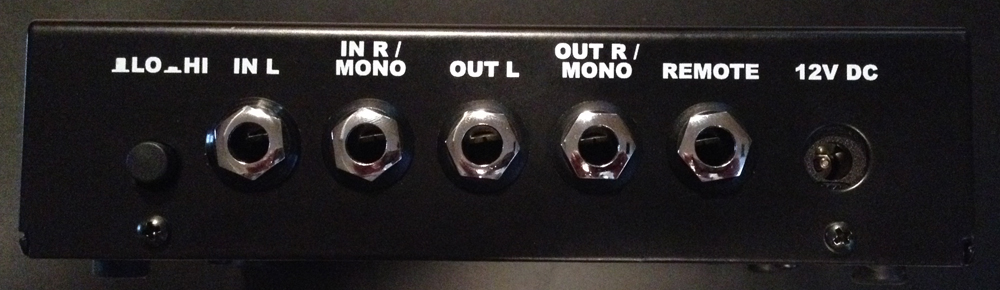
The Ventilator II measures 5.5 cm high (5.9 cm with the rubber feet) by 16.1 cm wide by 14.5 cm deep. In inches that’s 2.2 in high (2.3 with feet) by 6.3 in wide by 5.7 in deep. It weighs 1.067kg or 2.3 lbs. It’s a hefty, solid piece, encased in black powder-coated steel with maize and white silk-screened lettering. The top of the unit features five recessed knobs, four LEDs (overload, on, lo, and hi) and three silent stomp box type switches (bypass, stop, slow/fast). The back of the unit has a switch for lo/hi input operation, stereo inputs, stereo outputs, the remote input, and the 12v DC power connector. It ships with a universal wall-wart style power supply that can provide power in any world region.
Ventilator II connectors.
If the original Ventilator is any indication, the Ventilator II will handle the rigors of the road with ease. My original Ventilator still works flawlessly despite over four years of heavy road abuse.
CONTROLS:
Neo Instruments has added much more control over the sound of the Ventilator. Whereas the original Ventilator was meant to be a faithful recreation of the classic Leslie 122 speaker, with five adjustable parameters to slightly tweak that emulation, the Ventilator II provides all that plus the ability to go beyond authenticity and create your own sound.
The five recessed knobs serve two functions. In primary mode, which is the default when the unit is plugged in, the knobs control the parameters labeled in maize directly beneath each knob. The maize parameters from left to right across the Ventilator II’s face are FAST SPEED, BALANCE, DRIVE, MIX / DIST LO, and MIX / DIST HI. These are slightly different than the five knobs on the original.
But unlike the original Ventilator, the knobs also have secondary functions. These functions are accessed by pressing the BYPASS and SLOW/FAST switches together. When in 2nd FUNC mode, the LO/HI LEDs will blink together two times per second. The switches still work while in 2nd FUNC mode. Exiting the mode require you to press BYPASS and SLOW/FAST again.
Ventilator II front side.
In 2nd FUNC mode, the knobs control the parameters in white lettering. From left to right these parameters are SLOW SPEED, ACCELERATION, MODE, REMOTE, and LEVEL.
Let’s go through the five knobs and both their parameters one by one.
THE KNOBS:
KNOB 1 – FAST SPEED (primary function)
This is adjustable from -5 to +5. This parameter controls the speed of the virtual upper and lower rotors when on fast speed (known in Hammond parlance as tremolo).
KNOB 1 – SLOW SPEED (secondary function)
Adjustable from -5 to +5 as well. This parameter controls the speed of the virtual upper and lower rotors when on slow speed (known in Hammond parlance as chorale).
KNOB 2 – BALANCE (primary function)
Adjustable between -5 and +5. The Ventilator II, like its predecessor, splits the input signal at 800Hz (the same frequency as the crossover in the Leslie 122) and processes the resulting two signals independently. The BALANCE control allows the user to determine the mix between the virtual upper rotor and the virtual lower rotor. At 12 o’clock, the mix is equal. Turn the knob to the left and you get less upper rotor (less highs). Turn the knob to the right and you get less lower rotor (less lows).
KNOB 2 – ACCELERATION (secondary function)
This controls the amount of time it takes the virtual rotors to accelerate from stop or slow to fast speed. Between 9 o’clock and 3 o’clock the knob controls both rotors equally. Turn it to the left and the acceleration time is shortened. Turn it to the right and it is lengthened. Below 9 o’clock, only the bass rotor acceleration speeds up. Above 3 o’clock, only the upper rotor acceleration slows down. This gives the user a wide range of possibilities not available on a standard Leslie without modification.
KNOB 3 – DRIVE (primary function)
This adjusts the amount of overdrive added to the signal. The overdrive is one of my favorite aspects of the original Ventilator. It sounds authentic to a real Leslie 122 pushed into saturation. The Ventilator II overdrive is just as thick and warm as the original.
KNOB 3 – MODE (secondary function)
The original Ventilator had two modes, GIT and KEY, selectable via a push switch on the back. The Ventilator II has three modes selectable via knob 3.
Mode 1, with the knob at 7 o’clock (all the way counter-clockwise), is GIT1 which represents the guitar mode on the original Ventilator. This mode disables the speaker cabinet emulation and is useful for guitarists who want to maintain the sound of their own guitar amp / speaker combination while still enjoying the rotor simulation from the Ventilator.
Mode 2, with the knob at 12 o’clock (middle), is GIT2 from the Mini Vent. This is a more distant, mellower sound and like GIT1 disables the cabinet emulation.
Mode 3, with the knob at 5 o’clock (all the way clockwise) is the KEY mode for keyboardists as on the original Ventilator and includes the cabinet simulation.
KNOB 4 – MIX/DIST LO (primary function)
This controls the mix of the lower rotor in the signal as well as the distance of the virtual mic from the rotor. The first half of the travel (from all the way counter-clockwise to center) determines the mix. At 7 o’clock (all the way counter-clockwise) there is no lower rotor simulation in the mix. Note this does not remove the bass content from the signal; it simply removes the rotary effect. You can use this to emulate the classic “Memphis style” Leslie sound. The “Memphis style” on a real Leslie is achieved by unplugging the motors on the lower rotor, so that only the upper rotor spins.
From center to 5 o’clock (all the way clockwise), the knob adjusts the distance of the virtual mic from the lower rotor. This is handy for decreasing the amount of AM (amplitude modulation) in the signal. Pulling the mic further back decreases the “wub wub wub” effect that can be distracting, especially when you’re playing left hand and/or pedal bass. It might be cool for organ dubstep, though. 😉
KNOB 4 – REMOTE (secondary function)
This parameter changes the function of the REMOTE input jack on the back depending on the position of the knob.
With the knob at 7 o’clock (all the way counter-clockwise) the REMOTE jack is off.
With the knob at 10 o’clock, the MIX/DIST LO and MIX/DIST HI knobs can be externally controlled via an expression pedal like the Yamaha FC7. The range is from zero to the value set by the two knobs.
With the knob at 12 o’clock, the SPEED is continuously controllable via an expression pedal like the Yamaha FC7. The range is from the value of the SLOW SPEED as set by the knob (pedal minimum) to the FAST SPEED as set by the knob (pedal maximum). This is a very neat feature.
With the knob at 3 o’clock, stop/slow/fast speeds are switched (non-continuously) by external latching switches like the Hammond CU-1 halfmoon and original Ventilator remote.
With the knob at 5 o’clock (all the way clockwise) the stop/slow/fast speeds are switched (non-continuously) by unlatched switches such as sustain pedals and the Ventilator II remote.
KNOB 5 – MIX DIST/HI (primary function)
As with knob 4, this controls the mix of the upper rotor in the signal as well as the distance of the virtual mics from the rotor. The first half of the travel (from all the way counter-clockwise to center) determines the mix. At 7 o’clock (all the way counter-clockwise) there is no upper rotor simulation in the mix. Like knob 4, this doesn’t remove high-frequency content from the signal but rather the rotary simulation of the high frequencies.
From center to 5 o’clock (all the way clockwise), the knob adjusts the distance of the virtual mics from the upper rotor.
KNOB 5 – LEVEL (secondary function)
This adjusts the overall output level. The default is the middle position.
As well as the knobs there are three silent foot switches on the face. From left to right they are BYPASS, STOP, and SLOW/FAST. BYPASS engages a true analog relay-controlled bypass of the Ventilator II’s circuitry. The STOP switch stops the virtual rotors from spinning and positions them towards the virtual mics every time. SLOW/FAST switches between the slow rotor speed and the fast rotor speed.
Pressing BYPASS and SLOW/FAST together put the Ventilator II’s knobs into 2nd FUNCTION mode as indicated by the LO/HI LEDs blinking twice per second. Pressing BYPASS and SLOW/FAST again exits from 2nd FUNCTION mode.
Check out my video review for more information and a demonstration of these functions.
THE SOUND:
The Ventilator II’s pedigree is unmistakable. The rotary simulation is still, in my opinion, the best there is. It really captures the sound of a Leslie 122 mic’d up in the studio. Add a bit of room reverb and you can fool the listener into believing it’s a 122 in a room. The overdrive is fantastic. The sense of 3D realism is unparalled. The quality of Leslie sims has improved greatly over the last four years since the original Ventilator was released. Indeed, the sims in Hammond’s latest models (the SK series and the XK1c) are very good. But the Ventilator still has the edge in terms of the sense of 3D and the overdrive.
Since I wrote my original Ventilator review in 2010, I have been relying more and more on the Ventilator on the road. When I perform with organissimo or any other setting where I’m kicking bass, I prefer to have a real Leslie with me. But for gigs with bassists or at festivals or other large venues, the Ventilator is great. Especially for rock/blues gigs where a lot of volume is a requirement and you’re going through the FOH anyway. I always have my Ventilator with me on the road just in case. I never know what the backline will be from one gig to the next. And when I perform with blues singer Janiva Magness, my own rig consists of a Hammond SK1 and the original Ventilator. We do not travel with our own sound engineer and too many times we’ve had sound guys that don’t know how to properly mic or mix a Leslie. Giving them a single ¼” output makes everything so much easier for all parties. I’m looking forward to using the Ventilator II on the road due to it’s flexibility.
SHOULD YOU UPGRADE?
The Ventilator II is much more adjustable than the original Ventilator. You can get that Memphis sound with ease. You can achieve sounds that no older Leslie can do via the expression pedal control over the speed. With the new parameters you can really fine tune your own perfect Leslie sound. Even with the added adjustable parameters, programming the Ventilator II is immediate and easy. No menu diving or tiny screens to decipher.
Many keyboardists use keyboards for other sounds as well as organ. The stereo inputs allow you to connect said keyboards to the Ventilator II without sacrificing a stereo feed to your monitoring system and/or the front of house PA.
The output level control is another smart addition that many users requested.
And finally, a real STOP switch on the front is worth the upgrade price alone.
CONCLUSION:
Neo Instruments took longer than expected to release the Ventilator II but the level of thought and the quality of the design may give insight into why. I can’t really think of anything they missed. For guitarists and keyboardists alike the level of control and flexibility is several steps above the original. Yes, MIDI control would be nice but that would require a screen, which would take up more valuable front panel real estate and lead to menu-diving. The immediacy of the Ventilator is one of its most valuable features and the Ventilator II manages to stay true to that vision while giving the user more control. There are rumors that Neo Instruments is working on a Ventilator Pro rack unit which will have presets and MIDI, but for those of us who simply want the best rotary speaker simulator there is with easy real-time controls, the Ventilator II fits the bill perfectly.
I love technology. Though I sometimes feel musically anachronistic since I tend to favor styles from the past like 60s soul-jazz, 70s progressive rock, and 80s new-wave, I am absolutely enamored with modern music tech. I am thankful to be alive right now when you have access to an incredibly powerful recording studio in the palm of your hand on your tablet or on a desk via a laptop. It is truly amazing.
Like all technology, however, modern digital musical instruments / software exhibit pros and cons. The pros include obvious benefits like affordability, usability, flexibility, and high-fidelity. Ease of access is another biggie. I have sounds that emulate every classic keyboard instrument you can imagine, literally at my fingertips.
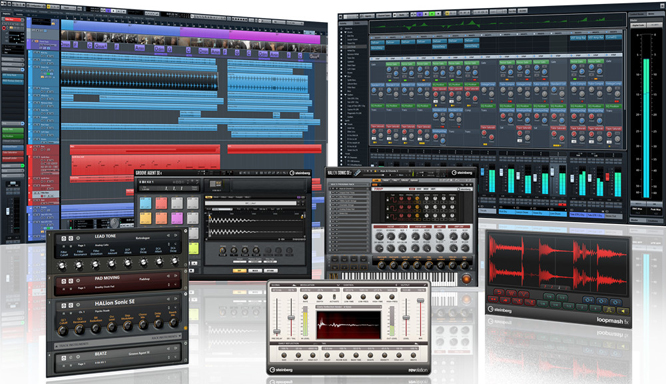
Steinberg Cubase 7.5 – My DAW of choice. If the engineers at Abbey Road had this back in the 60s…
The cons are a little less evident. The enormous wealth of options available can be paralyzing. What sound should I use for this particular section? Well, I could use a nice synth pad. Okay. A synth pad from what software synthesizer? And hours go by while I decide and scroll through endless presets.
I try to keep my collection of softsynths relatively small and yet I still routinely choose between PadShop, HALion Sonic (which contains numerous synth engines), Diva, Alchemy, Korg Monopoly, Zebra, FM8, Massive, or Dark Planet for that perfect pad sound. Oh yeah, I almost forgot; I also have the CS80V, Prophet V, and Oberheim SEM V available. And each of those synths has hundreds of different sounds to audition, not to mention the temptation to spend even more time making your own. And let’s not even mention my hardware synths. It can be truly overwhelming.
Another con is that despite some real stand-outs in the field (like Alchemy, Zebra, and PadShop), a lot of softsynths tend to sound mostly the same and feature the same categories and re-creations of sounds.
Beyond that is the nature of digital sound itself. What do I mean?
First a little backstory: When my father passed in 2008 I had been studying with him for about a year to learn the art of piano tuning. My dad raised his seven children with piano tuning, repair, and restoration. It’s a satisfying job and I always feel close to his memory when I tune especially since he bequeathed his tools to me. When I am home from touring, I sincerely enjoy tuning pianos, even the awful ones. Why? Because every single piano is different. Every one is a challenge. Every one requires special attention to bring out the best the instrument can offer. And each one sounds unique.
The tools of the trade.
Which finally brings me to digital pianos. No one can dismiss the convenience of digital pianos. I’m utterly amazed and delighted that Casio makes something as great as the Privia PX-5s, which weighs a mere 23lbs, plays and sounds beautiful. How far the technology has come! Digital pianos are wonderful especially on the road. I certainly do not long for the old days of the CP70, RMI Electra-Piano, and Kurzweil K250. Modern digital pianos are also indispensable in the studio for songwriting and production.
So what’s my beef? My beef is the sound of pianos on modern recordings and how they all sound the same. I love the pianos on older recordings because they are real pianos and as I mentioned above, each one is different and has its own character. And every engineer miked and EQ’d them differently. I am especially sensitive to this on my prog rock project. I love the piano on Firth of Fifth by Genesis (and the iconic intro by Tony Banks). It sounds different than any other piano because it was a unique instrument, the tuning wasn’t always perfect on every note, and it had its own idiosyncrasies. In the age of digital, it is too easy to be perfect. This is true for singing (pitch correction software), drums (samples + beat detection / grid locking), bass (samples, amp sims, micro-editing), guitar (amp simulators and micro-editing), and everything else. But it especially bothers me when it comes to pianos, probably due to an increased sensitivity from years of tuning.
It seems like everyone tends to load up their favorite piano sample library and that’s that. For awhile the sample library Ivory was ubiquitous. I could tell when they (the engineer and artist) used it. And there’s nothing wrong with that per se. But the sample libraries, as good as they are, still miss that realness and individuality. They are too perfect and they are always the same, every time you load it; like little clones of each other on every recording. Or like everyone is recording the same piano on the same day with the same mics, pitch-corrected, gated, and mathematically perfect.
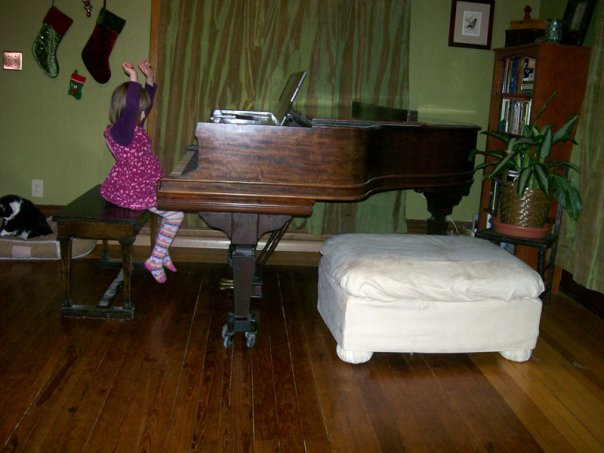
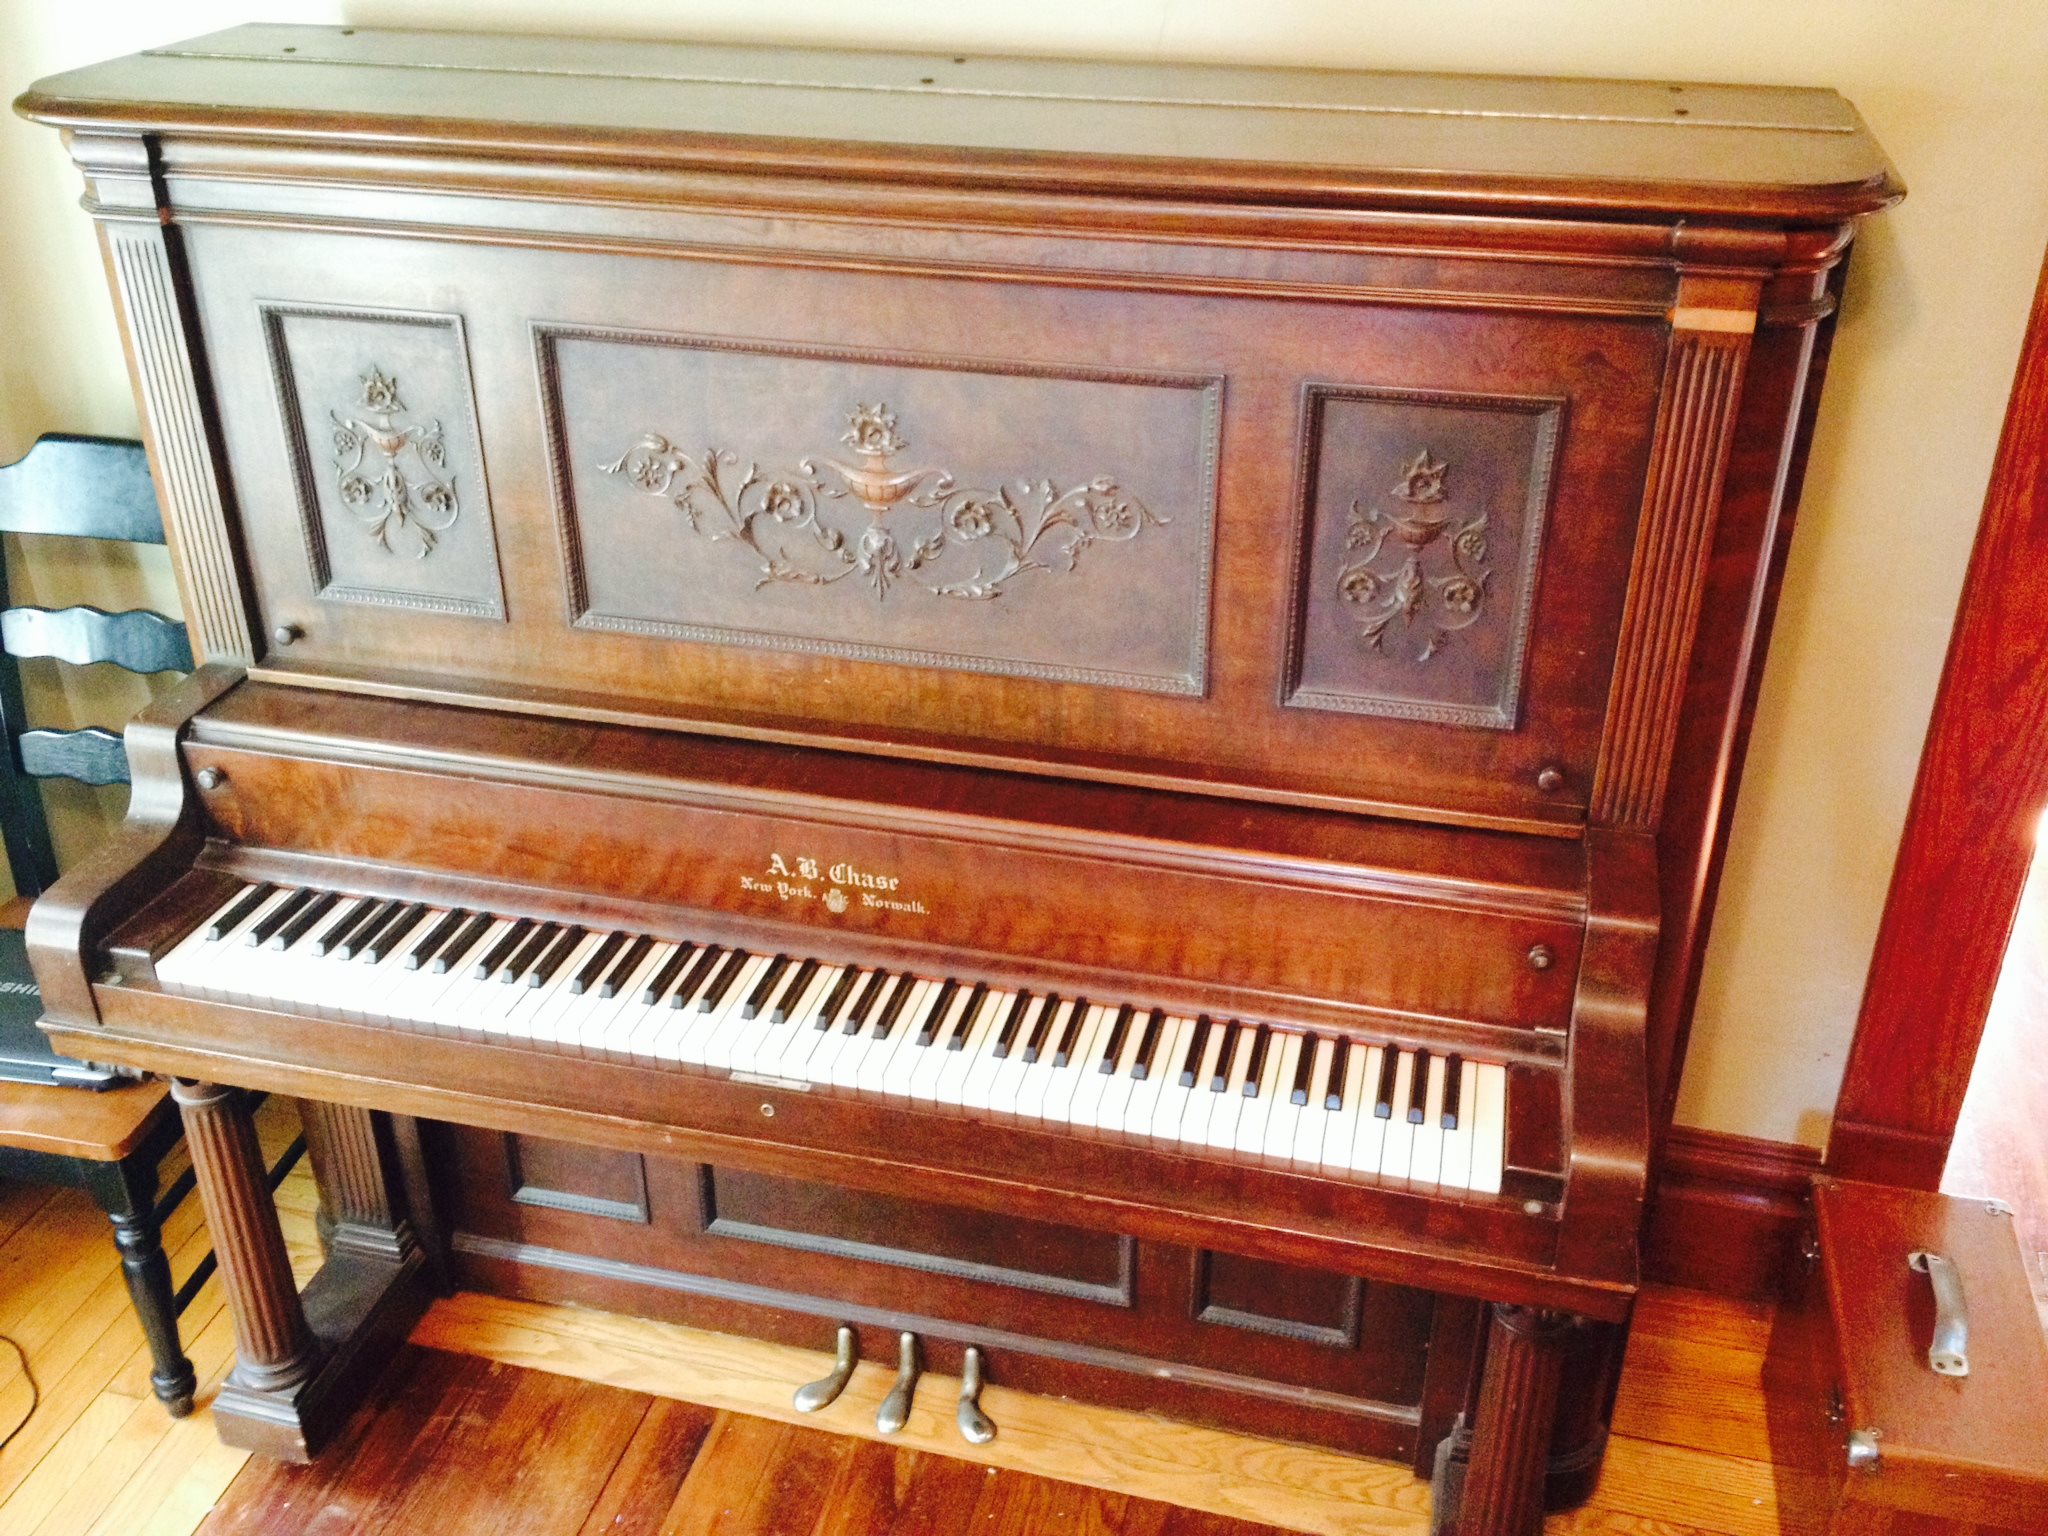
My daughter Zora, age five, at the 1913 AB Chase baby grand. Photo taken in 2009.
All this is to say (and perhaps justify to myself) that on my upcoming prog album, I will be recording a real piano. And if I can swing it, not just any piano but a beautiful 1913 AB Chase baby grand that I found and brought home in 2009. It’s small, yes. And it needs some work. But I fell in love with the tone when I first played it even though it was horribly out of tune. It is rich and full and beautiful. And most important, it is unique.
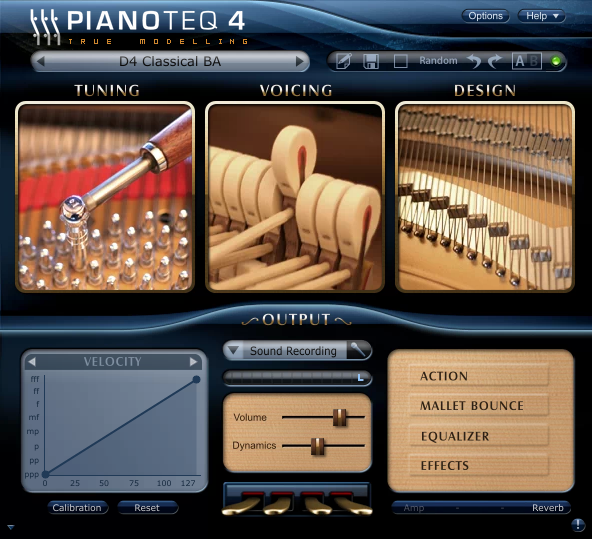
To get it ready, I am going to replace all 46 bass strings, most of the middle strings, the hammers, the dampers, and all the key punchings. I will also refurbish the smaller action parts and regulate everything. Once ready, I will move some furniture in our living room and place the piano in the middle. I will mic it with some high-quality mics (not sure which ones yet) and record all the piano parts that I already played and edited via MIDI. I’ve been using Pianoteq for the demos and it sounds great, but I want character, the kind of character only a real piano can give due to it’s individuality.
Pianoteq from Moddart. Pianoteq is a virtually modeled piano utilizing no sampling.
The AB Chase has been recorded before, on Greg Nagy’s last CD Fell Towards None. The part was very sparse and I purposely avoided the deadest of the 100+ year-old dead bass strings to make it work. It is one of my favorite tracks on the disc (the title track) because of the dark atmosphere the AB Chase created. But for the prog project, the piano needs to be in tip-top shape. It’s going to be played hard!
If I cannot get the AB Chase ready in time, I will rent a piano from a local dealer who specializes in restoring vintage Steinways, Mason & Hamlins, Chickerings, etc. I will find one that speaks to me in it’s own voice. It doesn’t even have to be a grand piano. Just the other day I tuned an old upright from the 1920s for a client (I forget the brand name but the company is long gone). While checking the tuning afterward I marveled at the gorgeous, warm tone from that old beauty, even with old dead bass strings and the original hammers. The old wood and steel and cast iron resonated in the room and spoke to me.
To my fellow musicians; use a real piano for recording whenever you can, even if it’s a little console, upright, or spinet (I used a Wurlitzer spinet on Root Doctor’s cover of I Wish It Would Rain and it was just perfect in that instance). Yes, that newly released sample library might sound amazing, but does it sound like you? Does it speak to you? Or does it make you sound like everyone else?
A 1903 A.B. Chase upright that I restored and sold in January 2014. My father’s piano tuning tool kit (the wooden box) is in the right corner. This piano had a gorgeous sound as well especially after I installed new hammers.
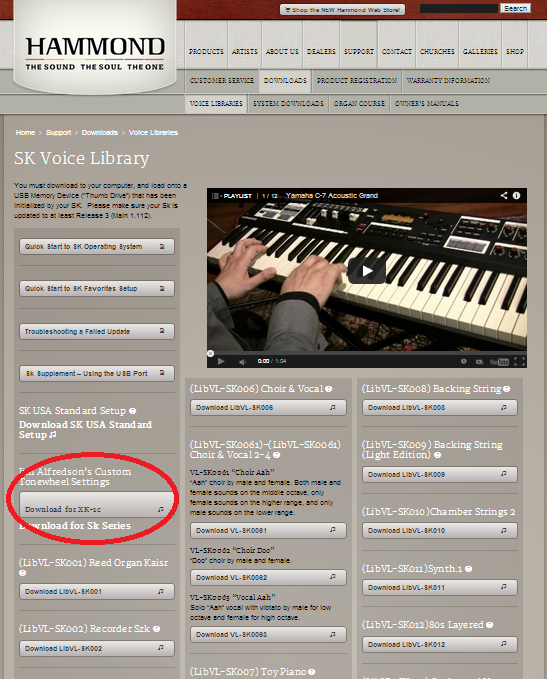
My custom tonewheel sets for the SK series and XK1c are available for free download over on the Hammond Organ USA site.
Look at the left-most column about one-third of the way down for Jim Alfredson’s Custom Tonewheel Settings.
Hammond USA site
The custom tonewheel sets are based on my beautiful 1954 Hammond C2 that graces my humble home studio. You can hear that organ on organissimo’s Dedicated CD. It’s one of my favorite Hammonds with a full, rich, thick tone especially in the upper end. You can read more about how I created the set and watch comparison videos between the SK2 and the Hammond C2 in this post.
Most of the music I record does not involve a bassist. Either I am covering the bass with my left hand and/or left foot on the Hammond organ, or I’m using synthesizers. Two projects currently on my plate, however, do feature electric bass. The first is Greg Nagy‘s upcoming third release, tentatively titled I Won’t Give Up. For these sessions, Detroit bassist Joseph Veloz is handling the low-end. The second is my progressive rock project with Gary Davenport on bass duties.
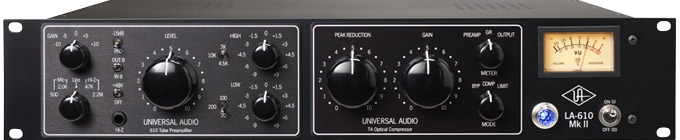
My humble studio is small and I do not own a bass amp. In my studio, I track the bass direct into a Universal Audio LA610 MkII tube preamp with just a hint of compression added on the front end. Joseph uses a nice five-string bass with both passive and active pickups. Gary sends me most of his tracks, recorded at his home direct into his ProTools audio interface. Both methods sound good, but they lack the roundness and fullness that a nice bass amp provides.
Universal Audio LA-610 MkII
I considered the option of re-amping the tracks into a bass amp at another studio, but this would cost both time and more importantly money. The budgets for both these projects are small. So I began looking for alternatives.
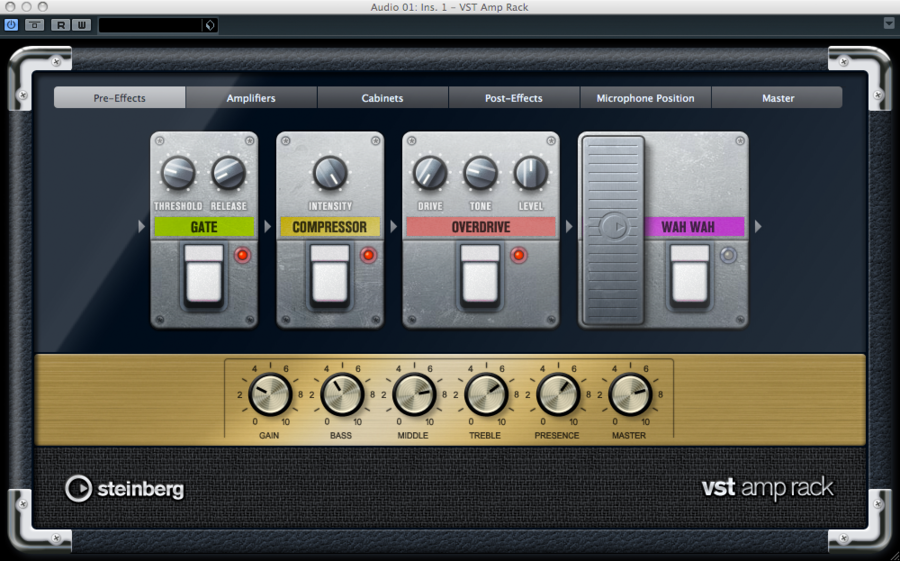
A lot of companies make guitar amp simulators. Many DAWs even ship with them, including Cubase, which is my DAW of choice. The VST Amp Rack plug-in within Cubase is quite good and I have used it on a variety of instruments like guitar, synthesizer, Wurlitzer electric piano, and even vocals. But like the majority of guitar amp plugs, it doesn’t have any options for bass.
Steinberg’s VST Amp Rack plug-in
After searching and reading reviews and suggestions, I came across the Swedish company Softube. They offer a plug-in called Bass Amp Room that seemed perfect for my needs. I downloaded the fully functional 20-day demo (iLok required) and began testing.
Immediately upon loading the plug-in the bass guitar tracks improved. And it wasn’t just a small improvement. The plug-in does exactly what it advertises. It takes your direct bass signal and puts it through an amp in a room with a mic in front of it. The results really speak for themselves and the Softube website has plenty of audio examples.
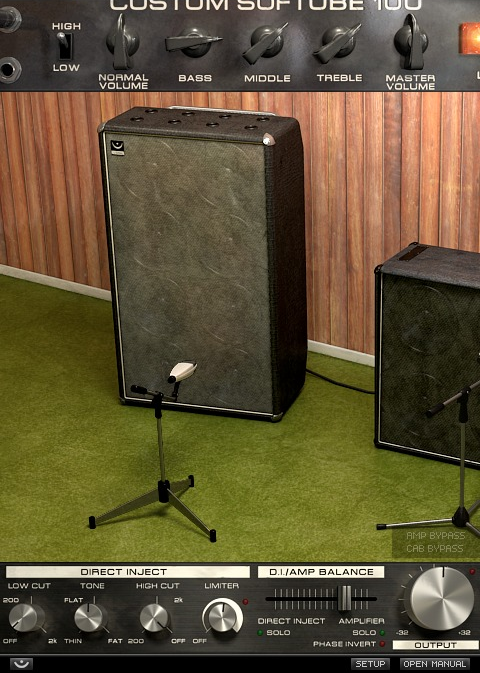
Softube Bass Amp Room plug-in.
The plug-in models three different cabinets; an 8 x 10″ cab, a 4 x 10″ cab, and finally a 1 x 12″ cab. The amp controls are very straight-ahead; normal volume, bass, mid, and treble tone controls, and a master volume along with a lo/hi input switch. They even included a direct inject section to mix some of the direct signal into the amp sound. The DI section includes more tone controls and a limiter.
You can bypass the amp simulation or the cabinet simulation. And you can position the virtual mic anywhere you want in front of the cabinets, backing it way off if you’d like or getting it up close and right on the cone.
I do like how the amp model breaks up when pushed. You can achieve some great fuzz bass tones out of the plug-in as well as some beautiful dark crunch.
I can only think of two areas which need improvement: It is odd that they did not model the classic 1 x 15″ cabinet made famous by the Ampeg B15 and James Jamerson. And I would like to see a cabinet with a horn. Perhaps those will be in a future update.
Despite these caveats, I bought the plug-in from Sweetwater Sound, which is just a bit cheaper than direct from Softube. Below is a mix I’ve been working on. This song was recorded in Los Angeles in October of last year. The bass was tracked direct into Nuendo through a Demeter tube bass DI. This is Gary Davenport on bass, myself on organ, Zach Zunis on guitar, and Matt Tecu on drums under the recording band name The Hollars. We hope to have an EP out this year.
I highly recommend Bass Amp Room to anyone needing a solid bass amp tone for their recordings. Check out the other amp models from Softube, too. It is worth demoing their Valley People Dyna-mite compressor plug-in. I had a real Dyna-mite at my studio for a week or so and compared the virtual with the real. They were very, very close (the plug-in had more high-end information). That’s on my shortlist as well.