INTRODUCTION:
When Neo Instruments released the Ventilator in 2010 it quickly became the standard by which all other rotary speaker simulators are judged. With easy accessibility to five real-time controls, bullet-proof construction, fantastic overdrive, and an extremely authentic dual-rotor emulation, the Ventilator justifiably took the reigns as king of the sims.
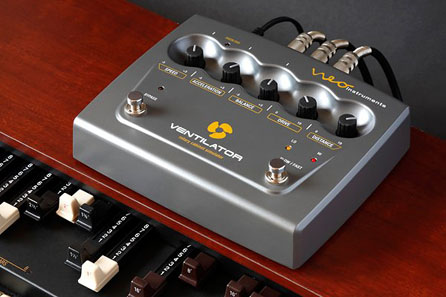
The original Ventilator. Read my review of the original by clicking on the picture.
Success breeds competition, however, and the Ventilator is no longer alone. In the intervening years, several competitors have arrived to try and wrestle the crown away from Neo Instrument’s flagship product. The BURN from GSi boasts 32 presets, a real tube overdrive section, MIDI control, and multi-effects. The Strymon Lex is much smaller and less expensive yet still has real-time controls. Pigtronix is releasing an all-analog emulation that promises to be very interesting. And the owner of the Leslie name, Hammond-Suzuki, released their own Leslie branded pedal featuring four distinct speaker emulations (122a, 147a, 18v, PR40) and plenty of real-time control.
Neo Instruments discontinued the original Ventilator in 2013 while introducing two new products, the Mini Vent and the Mini Vent for organ. These pedals are smaller (the same size as the Strymon Lex), less expensive, and have two programmable presets each. But they lack the real-time control and remote control input of their predecessor. You can read my review of the Mini Vent by clicking here, which includes a video.

Neo Instruments Mini Vent
Neo Instruments announced a successor to the original Ventilator in the spring of 2013. After a long wait, the Ventilator II is finally here. The footprint is similar though the look is much sleeker while still retaining the aforementioned bullet-proof construction of the original. The five real-time controls are still there but all five have dual functions accessible via a 2nd Function mode. How does the Ventilator II stack up against the original? How does it compare with the competition? What are the new features? And is it worth upgrading?
PHYSICAL SPECS:
The Ventilator II measures 5.5 cm high (5.9 cm with the rubber feet) by 16.1 cm wide by 14.5 cm deep. In inches that’s 2.2 in high (2.3 with feet) by 6.3 in wide by 5.7 in deep. It weighs 1.067kg or 2.3 lbs. It’s a hefty, solid piece, encased in black powder-coated steel with maize and white silk-screened lettering. The top of the unit features five recessed knobs, four LEDs (overload, on, lo, and hi) and three silent stomp box type switches (bypass, stop, slow/fast). The back of the unit has a switch for lo/hi input operation, stereo inputs, stereo outputs, the remote input, and the 12v DC power connector. It ships with a universal wall-wart style power supply that can provide power in any world region.
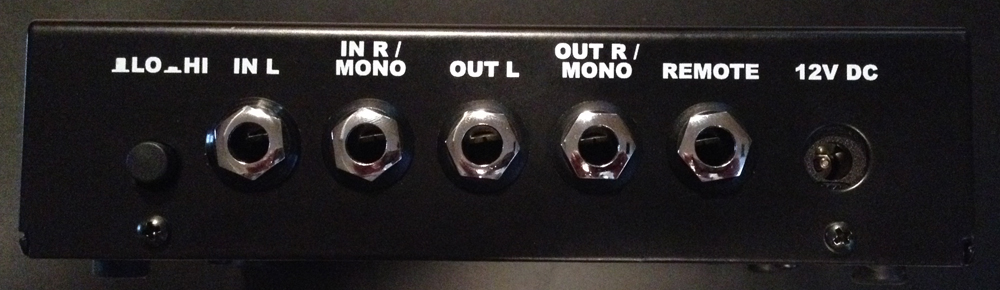
Ventilator II connectors.
If the original Ventilator is any indication, the Ventilator II will handle the rigors of the road with ease. My original Ventilator still works flawlessly despite over four years of heavy road abuse.
CONTROLS:
Neo Instruments has added much more control over the sound of the Ventilator. Whereas the original Ventilator was meant to be a faithful recreation of the classic Leslie 122 speaker, with five adjustable parameters to slightly tweak that emulation, the Ventilator II provides all that plus the ability to go beyond authenticity and create your own sound.
The five recessed knobs serve two functions. In primary mode, which is the default when the unit is plugged in, the knobs control the parameters labeled in maize directly beneath each knob. The maize parameters from left to right across the Ventilator II’s face are FAST SPEED, BALANCE, DRIVE, MIX / DIST LO, and MIX / DIST HI. These are slightly different than the five knobs on the original.
But unlike the original Ventilator, the knobs also have secondary functions. These functions are accessed by pressing the BYPASS and SLOW/FAST switches together. When in 2nd FUNC mode, the LO/HI LEDs will blink together two times per second. The switches still work while in 2nd FUNC mode. Exiting the mode require you to press BYPASS and SLOW/FAST again.
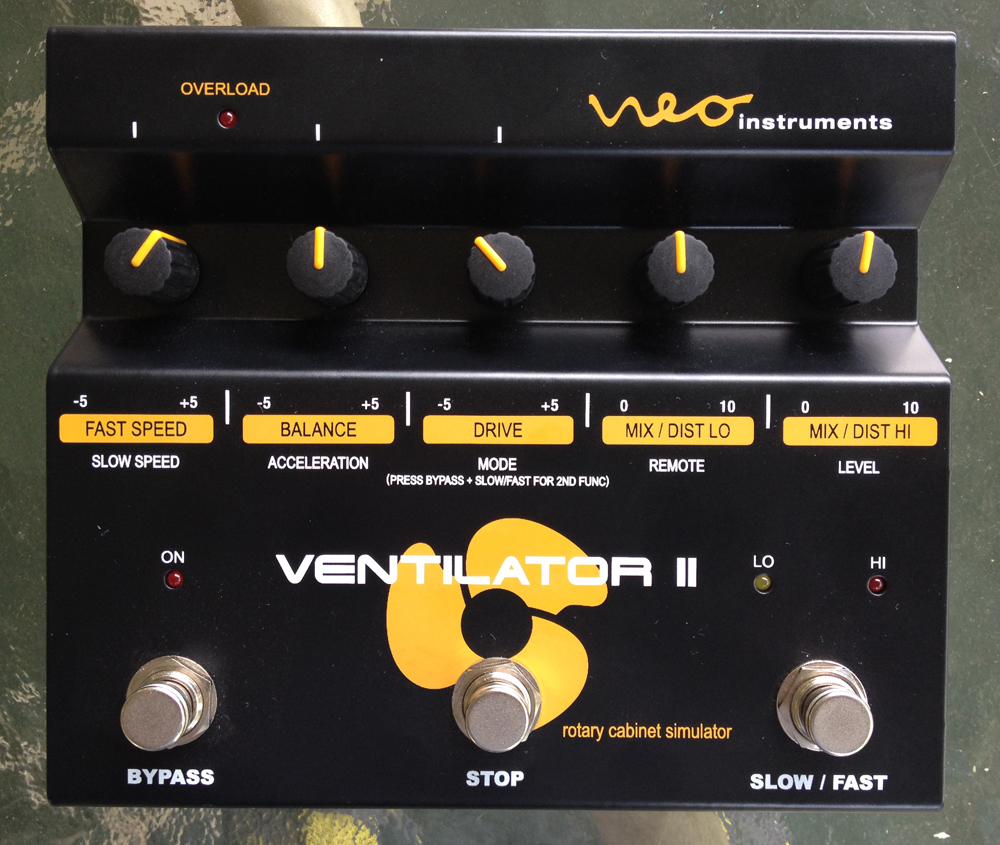
Ventilator II front side.
In 2nd FUNC mode, the knobs control the parameters in white lettering. From left to right these parameters are SLOW SPEED, ACCELERATION, MODE, REMOTE, and LEVEL.
Let’s go through the five knobs and both their parameters one by one.
THE KNOBS:
KNOB 1 – FAST SPEED (primary function)
This is adjustable from -5 to +5. This parameter controls the speed of the virtual upper and lower rotors when on fast speed (known in Hammond parlance as tremolo).
KNOB 1 – SLOW SPEED (secondary function)
Adjustable from -5 to +5 as well. This parameter controls the speed of the virtual upper and lower rotors when on slow speed (known in Hammond parlance as chorale).
KNOB 2 – BALANCE (primary function)
Adjustable between -5 and +5. The Ventilator II, like its predecessor, splits the input signal at 800Hz (the same frequency as the crossover in the Leslie 122) and processes the resulting two signals independently. The BALANCE control allows the user to determine the mix between the virtual upper rotor and the virtual lower rotor. At 12 o’clock, the mix is equal. Turn the knob to the left and you get less upper rotor (less highs). Turn the knob to the right and you get less lower rotor (less lows).
KNOB 2 – ACCELERATION (secondary function)
This controls the amount of time it takes the virtual rotors to accelerate from stop or slow to fast speed. Between 9 o’clock and 3 o’clock the knob controls both rotors equally. Turn it to the left and the acceleration time is shortened. Turn it to the right and it is lengthened. Below 9 o’clock, only the bass rotor acceleration speeds up. Above 3 o’clock, only the upper rotor acceleration slows down. This gives the user a wide range of possibilities not available on a standard Leslie without modification.
KNOB 3 – DRIVE (primary function)
This adjusts the amount of overdrive added to the signal. The overdrive is one of my favorite aspects of the original Ventilator. It sounds authentic to a real Leslie 122 pushed into saturation. The Ventilator II overdrive is just as thick and warm as the original.
KNOB 3 – MODE (secondary function)
The original Ventilator had two modes, GIT and KEY, selectable via a push switch on the back. The Ventilator II has three modes selectable via knob 3.
Mode 1, with the knob at 7 o’clock (all the way counter-clockwise), is GIT1 which represents the guitar mode on the original Ventilator. This mode disables the speaker cabinet emulation and is useful for guitarists who want to maintain the sound of their own guitar amp / speaker combination while still enjoying the rotor simulation from the Ventilator.
Mode 2, with the knob at 12 o’clock (middle), is GIT2 from the Mini Vent. This is a more distant, mellower sound and like GIT1 disables the cabinet emulation.
Mode 3, with the knob at 5 o’clock (all the way clockwise) is the KEY mode for keyboardists as on the original Ventilator and includes the cabinet simulation.
KNOB 4 – MIX/DIST LO (primary function)
This controls the mix of the lower rotor in the signal as well as the distance of the virtual mic from the rotor. The first half of the travel (from all the way counter-clockwise to center) determines the mix. At 7 o’clock (all the way counter-clockwise) there is no lower rotor simulation in the mix. Note this does not remove the bass content from the signal; it simply removes the rotary effect. You can use this to emulate the classic “Memphis style” Leslie sound. The “Memphis style” on a real Leslie is achieved by unplugging the motors on the lower rotor, so that only the upper rotor spins.
From center to 5 o’clock (all the way clockwise), the knob adjusts the distance of the virtual mic from the lower rotor. This is handy for decreasing the amount of AM (amplitude modulation) in the signal. Pulling the mic further back decreases the “wub wub wub” effect that can be distracting, especially when you’re playing left hand and/or pedal bass. It might be cool for organ dubstep, though. 😉
KNOB 4 – REMOTE (secondary function)
This parameter changes the function of the REMOTE input jack on the back depending on the position of the knob.
With the knob at 7 o’clock (all the way counter-clockwise) the REMOTE jack is off.
With the knob at 10 o’clock, the MIX/DIST LO and MIX/DIST HI knobs can be externally controlled via an expression pedal like the Yamaha FC7. The range is from zero to the value set by the two knobs.
With the knob at 12 o’clock, the SPEED is continuously controllable via an expression pedal like the Yamaha FC7. The range is from the value of the SLOW SPEED as set by the knob (pedal minimum) to the FAST SPEED as set by the knob (pedal maximum). This is a very neat feature.
With the knob at 3 o’clock, stop/slow/fast speeds are switched (non-continuously) by external latching switches like the Hammond CU-1 halfmoon and original Ventilator remote.
With the knob at 5 o’clock (all the way clockwise) the stop/slow/fast speeds are switched (non-continuously) by unlatched switches such as sustain pedals and the Ventilator II remote.
KNOB 5 – MIX DIST/HI (primary function)
As with knob 4, this controls the mix of the upper rotor in the signal as well as the distance of the virtual mics from the rotor. The first half of the travel (from all the way counter-clockwise to center) determines the mix. At 7 o’clock (all the way counter-clockwise) there is no upper rotor simulation in the mix. Like knob 4, this doesn’t remove high-frequency content from the signal but rather the rotary simulation of the high frequencies.
From center to 5 o’clock (all the way clockwise), the knob adjusts the distance of the virtual mics from the upper rotor.
KNOB 5 – LEVEL (secondary function)
This adjusts the overall output level. The default is the middle position.
As well as the knobs there are three silent foot switches on the face. From left to right they are BYPASS, STOP, and SLOW/FAST. BYPASS engages a true analog relay-controlled bypass of the Ventilator II’s circuitry. The STOP switch stops the virtual rotors from spinning and positions them towards the virtual mics every time. SLOW/FAST switches between the slow rotor speed and the fast rotor speed.
Pressing BYPASS and SLOW/FAST together put the Ventilator II’s knobs into 2nd FUNCTION mode as indicated by the LO/HI LEDs blinking twice per second. Pressing BYPASS and SLOW/FAST again exits from 2nd FUNCTION mode.
Check out my video review for more information and a demonstration of these functions.
THE SOUND:
The Ventilator II’s pedigree is unmistakable. The rotary simulation is still, in my opinion, the best there is. It really captures the sound of a Leslie 122 mic’d up in the studio. Add a bit of room reverb and you can fool the listener into believing it’s a 122 in a room. The overdrive is fantastic. The sense of 3D realism is unparalled. The quality of Leslie sims has improved greatly over the last four years since the original Ventilator was released. Indeed, the sims in Hammond’s latest models (the SK series and the XK1c) are very good. But the Ventilator still has the edge in terms of the sense of 3D and the overdrive.
Since I wrote my original Ventilator review in 2010, I have been relying more and more on the Ventilator on the road. When I perform with organissimo or any other setting where I’m kicking bass, I prefer to have a real Leslie with me. But for gigs with bassists or at festivals or other large venues, the Ventilator is great. Especially for rock/blues gigs where a lot of volume is a requirement and you’re going through the FOH anyway. I always have my Ventilator with me on the road just in case. I never know what the backline will be from one gig to the next. And when I perform with blues singer Janiva Magness, my own rig consists of a Hammond SK1 and the original Ventilator. We do not travel with our own sound engineer and too many times we’ve had sound guys that don’t know how to properly mic or mix a Leslie. Giving them a single ¼” output makes everything so much easier for all parties. I’m looking forward to using the Ventilator II on the road due to it’s flexibility.
SHOULD YOU UPGRADE?
The Ventilator II is much more adjustable than the original Ventilator. You can get that Memphis sound with ease. You can achieve sounds that no older Leslie can do via the expression pedal control over the speed. With the new parameters you can really fine tune your own perfect Leslie sound. Even with the added adjustable parameters, programming the Ventilator II is immediate and easy. No menu diving or tiny screens to decipher.
Many keyboardists use keyboards for other sounds as well as organ. The stereo inputs allow you to connect said keyboards to the Ventilator II without sacrificing a stereo feed to your monitoring system and/or the front of house PA.
The output level control is another smart addition that many users requested.
And finally, a real STOP switch on the front is worth the upgrade price alone.
CONCLUSION:
Neo Instruments took longer than expected to release the Ventilator II but the level of thought and the quality of the design may give insight into why. I can’t really think of anything they missed. For guitarists and keyboardists alike the level of control and flexibility is several steps above the original. Yes, MIDI control would be nice but that would require a screen, which would take up more valuable front panel real estate and lead to menu-diving. The immediacy of the Ventilator is one of its most valuable features and the Ventilator II manages to stay true to that vision while giving the user more control. There are rumors that Neo Instruments is working on a Ventilator Pro rack unit which will have presets and MIDI, but for those of us who simply want the best rotary speaker simulator there is with easy real-time controls, the Ventilator II fits the bill perfectly.