As of this writing, all bars, restaurants, live music venues, casions, and more are ordered closed by the State of Michigan to prevent the spread of coronavirus. As a musician who makes his living playing live, this has been an enormous financial blow to my income. So this past Sunday, I began a live-streamed music series in my basement entitled, appropriately enough, Live From Jimmy’s Basement. Think “Live At Daryl’s House” without the big budget, big stars, or television contract!
Since launching the series this weekend, I have been inundated with messages from other musicians asking about my live-streaming setup. If you haven’t seen the video yet, head over to the Live From Jimmy’s Basement FB page and check it out. Also give us a LIKE to support the page and the musicians involved as we try to navigate this new world where we suddenly have absolutely no gigs for the foreseeable future. As freelance artists, this is pretty much our worst nightmare.
NOTE:
I’m going to assume that any musician reading this already has a good grasp on how to mic their instruments and connect those mics to a mixer, create a viable mix, etc. This article will instead focus on the video side of things.
CONCEPTS
CAMERAS
If you want to do a multiple camera live-stream the first thing you’ll need are multiple cameras. I suggest using the same brand and model of camera rather than each camera being different. This is for several reasons.
Firstly, the image quality will be the same if the cameras are the same, whereas if they are different then one camera might look more crisp, another brighter, yet another more grainy, etc.
Secondly, a camera that has an HDMI output will provide a much better image. HDMI is the prosumer standard now and most cameras, even the cheap ones, have an HDMI output.
And thirdly, not all cameras use the same frame rate or format. And the gear required to switch between them often has to be set to one format. So if you have one camera that shoots at 1080p (progressive scan) at 60fps and another that shoots at 1080i (interlaced) at 60fps, you won’t be able to use both. I discovered this the hard way. I have a really nice Canon R800 camcorder that can only output in 1080p but my other cameras only do 1080i, so I cannot use them together with the switcher.
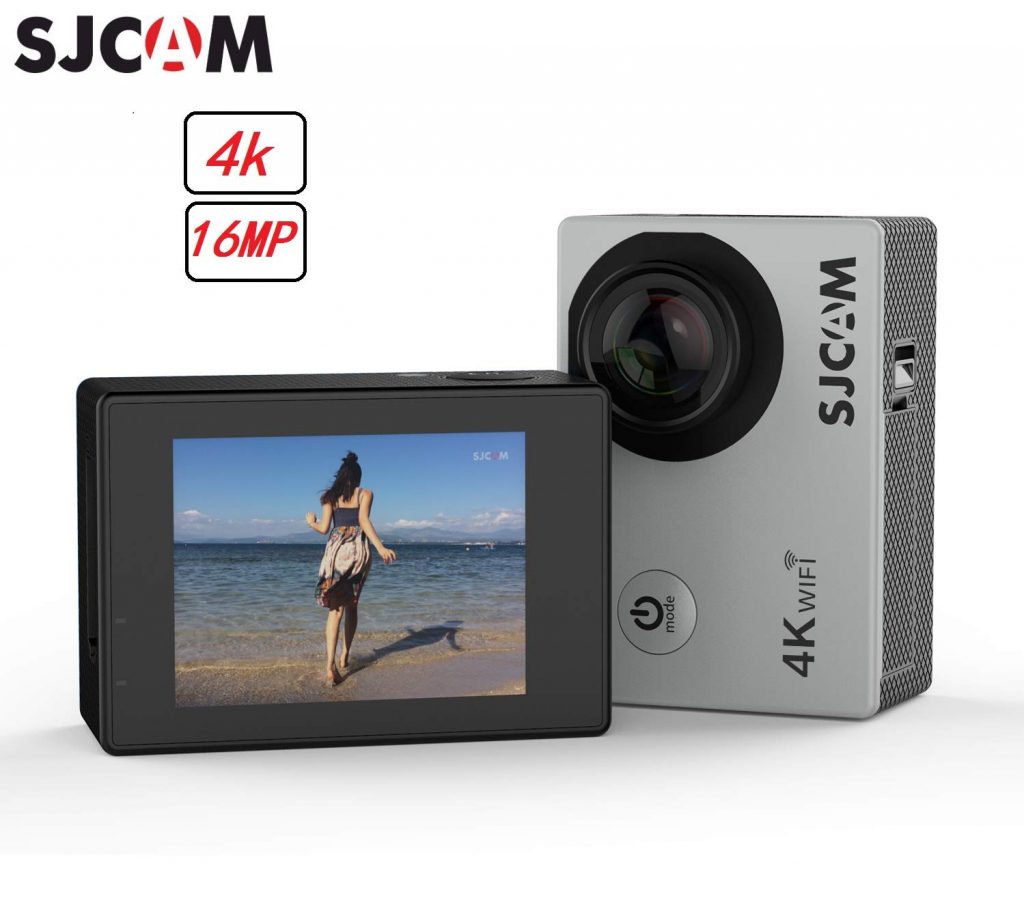
The cameras I used for my live-streaming are SJCAM SJ4000 action cameras. (NOTE from Future Jimmy: See my edit below. The new SJ4000 models are different from my old 2014 models). They are very inexpensive. You can find them for around $50 to $60 each. They are essentially cheap knock-offs of the more prominent and expensive GoPro brand. I bought two about six years ago on a whim, thinking if they were really bad I would give them to my kids to mess with. Thankfully they turned out to be decent. So much so that I later bought two more and have used them on most of my YouTube videos ever since. They do struggle in low light situations, but otherwise give a fairly good HD picture. The on-board microphones are not completely terrible either but do overload quickly. The newer models are now 4k. And they have a micro-HDMI output and the ability to turn off the On Screen Display ( the text that includes battery life, record time and indicator, etc.) which some of the other cheap action cameras cannot. I’m looking at you, Akaso EK7000.
I wanted to use my Canon R800 camcorder which has a better picture, but I only have one of those and as mentioned above it can only output 1080p. The SJCAM cameras output 1080i. And so my switcher would recognize one but not the other depending on how it was set.
You will also need a way to mount the cameras. I use gooseneck mounts that I then clip to mic stands.
MARCH 20, 2020 EDIT: Since the original publication of this article, I ordered four newer SJCAM SJ4000 cameras, specifically the AIR 4K model. I am immensely disappointed in them. Not only do they not actually record at 4K (rather an interpolated 1080p resolution), the HDMI output is actually a lower resolution than my six year old original SJ4000 cameras and you cannot turn off the On Screen Display. So I will be sending these back. They are useless. My switcher doesn’t even recognize their output, that’s how low of a resolution it is.
I spent several hours combing through the user manuals for various inexpensive action cameras and I cannot find one that supports disabling the On Screen Display via the HDMI output. I don’t know why that feature has gone away, but it seems to be exceedingly rare these days.
A good alternative is the Canon Vixia RF800, which is not an action camera but is relatively inexpensive (around $200), has a mini-HDMI port, and outputs at 1080p at 60fps with no extraneous text / information on the output. It’s a much better camera. I own one but unfortunately I can’t use it with my SJ4000 cameras because it outputs at a different frame-rate. I am seriously considering just buying two more and getting rid of the action cameras.
MARCH 21, 2020 EDIT: I’ve spent hours combing through even more action camera models and have found a model that appears to allow the user to disable the On Screen Display. The frustrating thing is that I do not know what the resolution of the HDMI output is. No review ever mentions it or even tries the HDMI output on these cameras as far as I can tell. That said, I am going to order one and see if it works. The camera is the EXVIZ S2 Lite 1080p Action Camera. And here is the user manual. On Page 16 it lists the setting for turning on or off the On Screen Display.
On March 21, 20202 we did another test livestream (you can see it on the Live From Jimmy’s Basement FB page) and used the drummer’s Sony HDR-MV1 as our fourth camera. It looked spectacular and actually put my SJCAM cameras to shame. We had to edit the settings in the camera to make it look worse because the contrast between the image from the Sony and the other cameras was too jarring. It has a micro-HDMI output that can be changed from 1080i to 1080p and even 720p. That particular model has two high-quality stereo mics on it, which I do not need for my purposes. The less expensive HDR-AS300 appears to be the same camera just sans mics. They can be found on eBay for around $200. I may pick one up just because the image quality was so much better than the cheap action cameras. The only issue we ran into was that we had to run it from battery power as anytime we plugged in the USB cable to charge it, it would revert to playback mode.
MARCH 25, 2020 EDIT: I went ahead and bought an EZVIZ S2 camera and made a quick comparison video. I like it a lot. It outputs HDMI at 1080i like my older SJCAM models, you can turn off the On Screen Display, and the ISO levels are much improved over the SJCAM. I ordered three more. Another bonus is that the HDMI output on the EZVIZ cameras is not delayed compared to the audio, unlike the SJCAM.
CABLES
You will need some micro-HDMI to HDMI adapters as well as a decent number of regular HDMI cables. I bought mine from Amazon and they were fairly inexpensive. It’s not a bad idea to have some HDMI couplers handy as well in case you need to extend a cable.
Also, unless you want to be constantly worrying about battery life, it’s a good idea to purchase some USB extension cables. The SJCAM are powered and charged via an included micro USB to USB A cable. But the included cable is quite short, which makes plugging them in while using them a pain. So I bought some 15′ female USB to male USB A 2.0 extension cables.
LIGHTS?
Do you need lights? The SJCAM SJ4000 cameras are not great in low light, so some lighting augmentation will help with the clarity of the image. I do not own any lights yet but I plan on buying some LED softboxes soon.
SWITCHER
In order to access multiple cameras at once, you’re going to need a video switcher. A video switcher, as the name implies, is a device that can accept multiple camera signals and switch between them at the push of a button. There are two types of switchers, passive and active. Passive switchers are used if you have two devices, say a Blu-Ray player and an Xbox One, but only one free input on your television. You can use a cheap, passive switcher to change from one to the other without having to go around the back of your equipment and unplug this or that and plug something else in.
The problem with passive switchers is that during the switching process, the video signal is lost for a moment and it takes a few seconds for the television, or in our case the live streaming service, to re-sync itself with the new signal. This would be a big problem in live-streaming. You would get a blank, black screen or worse the streaming service might stop because it perceives a loss of signal.
Active switchers allow you to change cameras without losing the sync signal, which means no interruptions in your stream. They also usually offer slick fades between sources and some can even do picture in picture and green screen keying as well. But of course they are much more expensive.
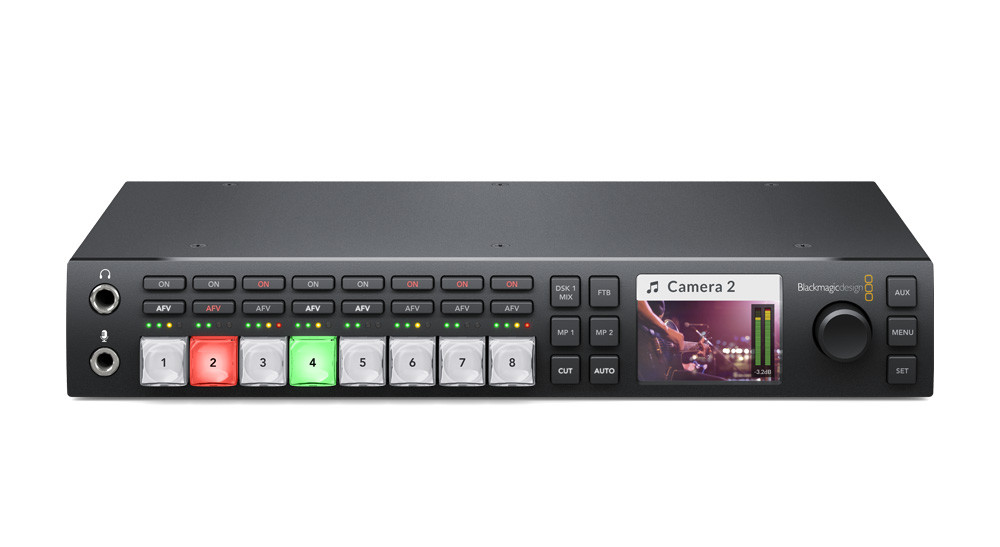
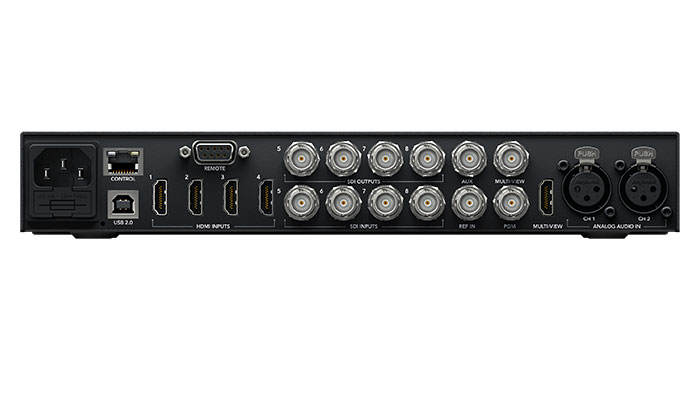
The video switcher I am using is the Blackmagic ATEM Television Studio HD. It features four HDMI inputs and four SDI inputs. SDI is a professional standard for video signals carried on BNC cables. I also have a HDMI to SDI converter box so I can use those inputs with cameras that have regular HDMI outputs.
The ATEM also features XLR inputs, so I can connect my audio mixer outputs directly to the video switcher and it will send that audio to it’s main video output over HDMI and/or SDI.
If you’re already balking at the price, don’t worry. I will give less expensive alternatives at the end of this article.
VIDEO CONVERTERS
So now we have our cameras and our switcher wired together and we have our audio coming in. We’re ready to stream, right?
Not quite. We need one more piece of gear. We cannot input an HDMI signal into our computer directly. We need to convert it to something that streaming services like Facebook or YouTube will accept.
We need a video converter, also known as a web broadcaster. This takes the high resolution signal from our switcher and converts it into a lower bitrate, lower resolution signal that can be successfully streamed without choking either our internet connection or the streaming service.
For example, Facebook only accepts video streams at 720p resolution and audio up to 160kbps.
I use the Blackmagic Web Presenter for this purpose. It takes the HDMI output from my switcher and converts it to a USB output. I can then plug than into my computer and my computer thinks that the signal is coming from a webcam.
March 21, 2020 EDIT: It appears that FB Live will now accept 1080p resolution video for streaming. That means the Web Presenter is out of date. For alternatives that can output 1080p streams to USB, look up capture cards made for gamers. There are a lot of options in this field including the Cam Link and HD60 Pro from Elgato, the MiraBox HSV321, and the AVerMedia Live Gamer 2. Gamer capture cards are designed for low-latency, high-quality streaming.
Also, FB Live now accepts stereo audio.
March 25, 2020 EDIT: I went ahead and bought a Elgato HD60 Pro. The quality of the video went up at least 10 fold. The HD60 feeds 1080p straight to OBS and the footage looks great. I’m very happy.
BROADCAST SOFTWARE
So NOW we’re ready to go live on Facebook or YouTube right? We’ve got our cameras, our switcher, our web broadcaster that’s down converting the video. Surely we can now start streaming?
Well, yes you could but you would not be getting the highest quality. To achieve the highest quality there is one last step.
Facebook will accept that signal from our web broadcaster and treat it like a webcam. The problem is that if Facebook thinks it’s just a webcam, it will cut our stream data rate even further. So we won’t be getting 160kbps audio, we will be getting half that or worse. And we won’t be getting 6000kbps bitrate on our video either. So our video will look choppy and blocky and our audio will be very low resolution with lots of compression artifacts.
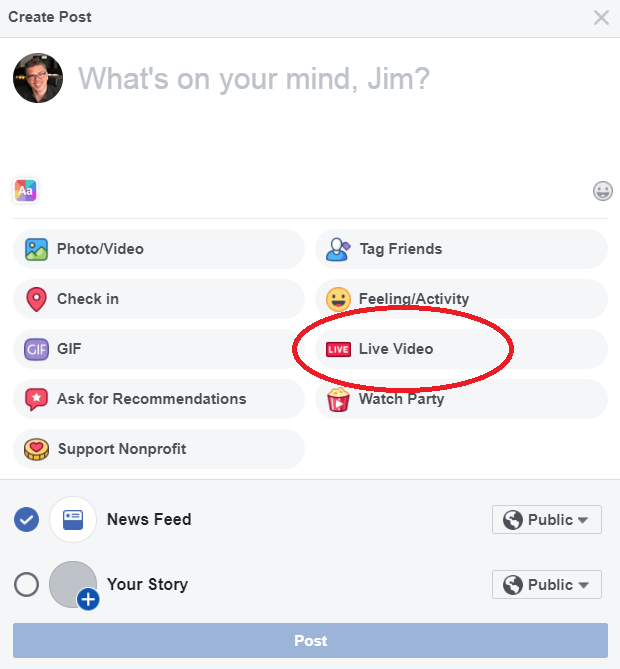
What we need is a piece of software that tells Facebook we’re serious about streaming. This software will connect to Facebook with a custom LIVE API key and allow us to use higher bitrates.
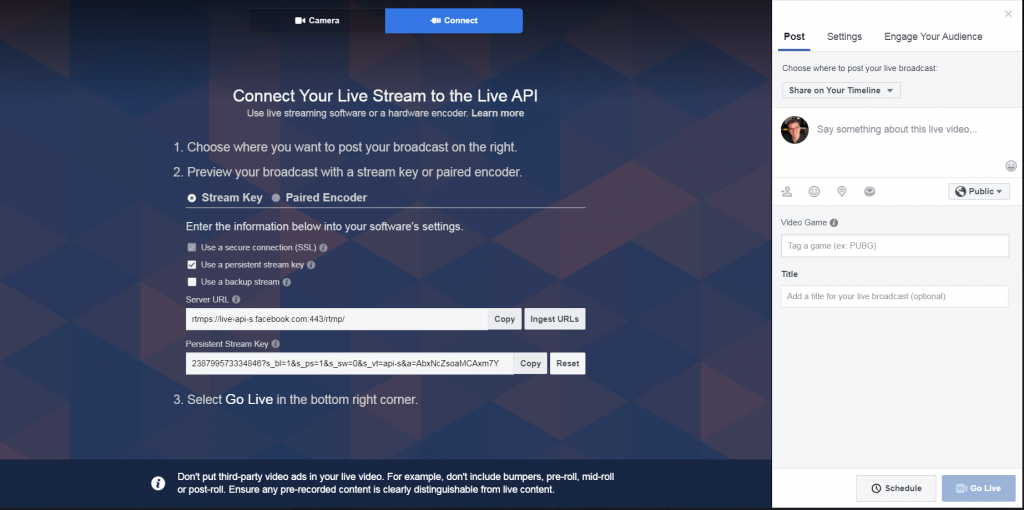
I use OBS, Open Broadcaster Software, which is a free, open source software for just this purpose. It works on either Mac or PC and will connect with Facebook, YouTube, Twitch, and other streaming services (one at a time) to provide the best possible streaming bitrate possible.
It is beyond the scope of this article to detail exactly how to setup OBS with those streaming services, but there are many tutorials on the web and OBS offers its own tutorials as well.
ALTERNATIVES
By now you may be balking at the cost involved. As mentioned, I was gifted the Blackmagic gear, for which I am extremely grateful. The other gear, such as cameras and cables and such, I have amassed over the years. If not for those two things, the initial cash outlay would be quite steep.
The most expensive piece is the ATEM Television Studio HD. At just under $1000 it is probably beyond the budget of most musicians, especially right now. However, Blackmagic recently released a great, low cost alternative.
The Blackmagic ATEM Mini switcher is less than $300, has four HDMI camera inputs, a USB C 1080p webcam output (so it takes the place of the separate Web Presenter unit) and two microphone inputs. It can do fades between cameras, audio mixing via the software, and more. At roughly $300 it is a huge bargain. Instead of spending $1000 for the ATEM Television Studio HD and another $500 for the Web Presenter unit, you can have the same functionality, albeit with less inputs and less flexibility, for a mere $300.
One drawback of the ATEM Mini is that it only has two microphone inputs on 1/8″ jacks and I do not know if you can pan them left and right in the software mixer. Facebook Live streaming is mono anyway, so that’s probably not a big issue. However, you will have to be very careful with your audio signal as to not overload that input. Most mixer outputs are at line level and those levels will quickly overload the microphone inputs leading to horrible distortion. You will also need the correct adapters to convert your mixer’s output (most likely XLR or 1/4″) to the mini jack format.
EDIT: After reading the manual and watching various videos on the ATEM Mini, it appears that the 1/8″ inputs can be switched to line level. It also appears they are both stereo inputs.
It also appears as though it will accept different video formats and convert automatically, unlike the more expensive ATEM Television Studio HD.
And as mentioned in a previous edit above, FB Live now accepts stereo audio.
CLOSING THOUGHTS
This is just an overview of the process. As mentioned there are a lot of videos and articles on the web about streaming. Also, there are details with the set-up that I didn’t go into. For example, adding external audio (that is, audio not coming from the cameras themselves) will most likely result in audio/video sync issues. In my experience, the external audio signal is about 5 frames ahead of the video signal. This is a small amount but it is noticeable. I don’t know if the ATEM Mini compensates for this internally, but the more expensive ATEM Television Studio HD does not so it would surprise me if the cheaper version did. To work around this, I am using a Behringer DSP8024 processor to add 140ms of delay to my incoming audio. I just happened to have that old thing lying dormant in my garage from an old band I left 11 years ago. The added bonus is that it also has a limiter which will prevent my audio levels from over-loading.
As you can tell, this is a complicated endeavor. I spent several days and nights trouble-shooting small problems that arose, like the inability to use different video formats, another action camera’s inability to turn off the on screen display, sync and timing issues, audio issues, and software issues. But with patience, a lot of reading, and some experimenting, it is possible to stream high quality content.
By the way, if this article sounds like a commercial for Blackmagic, it kind of is. I am not endorsed by them. I do not receive any money or products from them. But I do really like their stuff. And in my experience their gear is very reliable and easy to use. More importantly, it’s what I have, so I use it!
ADDENDUM
For our first live-stream (and our upcoming one), I am not only performing as a musician but also engineering the session as well. How did I do both? On the audio side of things, I used my Presonus StudioLive 16.0.2 mixer to record our rehearsal into Cubase. Then I played the rehearsal back through the board and did a mix using the boards’ EQ, compression, reverb, etc. After switching the channels back over from my DAW to the analog inputs, I have my mix for the live-stream. I also multi-track the session for re-mixing later if need be.
My wife works the ATEM, doing the video switching while also monitoring the audio levels to make sure they do not peak.
In addition, I record the video output from the ATEM before it is down converted. To do this, I use a Blackmagic Hyperdeck Studio Mini. This way I have a copy of the live program, complete with switched cameras, audio, and slates, ready to be re-edited if need be but more importantly uploaded in HD to Youtube. I actually have two Hyperdecks and use one for recording the program and another for playing the slates (graphics) during the show. Displaying slates, such as my slate with all the Paypal, Venmo, and Cash app information (aka the Virtual Tip Jar!) could also be done with a laptop / computer that has an HDMI output. Route that into the switcher and it will treat it as just another video source. And you can also record the program in OBS, though it will be after down conversion. I think the ATEM Mini can hold two slates in memory as well.
Speaking of Paypal, if you found this article helpful, feel free to send a couple bucks my way. My kids will appreciate it! And please comment with any questions you have. I’ll try to help as much as I can.
I hope this article helps my fellow musicians survive in this new world of closed bars, restaurants, and venues. No gigs is no good for us freelance artists. Hang in there, be safe, and take care!
Jim this is great. Thank you so much!